TOOLS
- Drill
- 5/16" hex head bit
- Hacksaw or Miter Saw
- Trowel/Shovel
Start by installing all pre-bent and corner coping sections first with the self-tapping screws provided. During the installation process, make sure that the coping lip fits snuggly against the face or top panel.
Screws should be driven at 1 ft. intervals; a drill with a 5/16" hex head bit works best for driving these screws through the coping and into the pool panel.
IMPORTANT
If you have foam form coping refer to that section.
BULLNOSE COPING
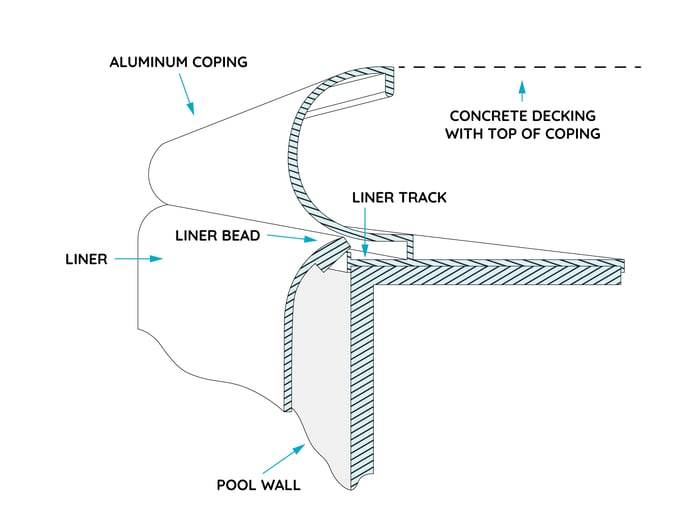
After the corners are secured, screw the long lengths of coping in place in the same manner. Make sure the liner receptacle on the lower edge of the coping is flush with the top inside edge of the pool walls. Included with the coping are 2" wide coping clips to use to cover coping joints. These clips must be placed before the concrete deck is poured.
The coping provided with the pool has a dual purpose of acting as a receptacle (liner track) for retaining the liner bead as well as serving as an edge against which the concrete is poured.
The image below shows rounded bullnose coping. Flat-face bullnose coping comes in two styles.
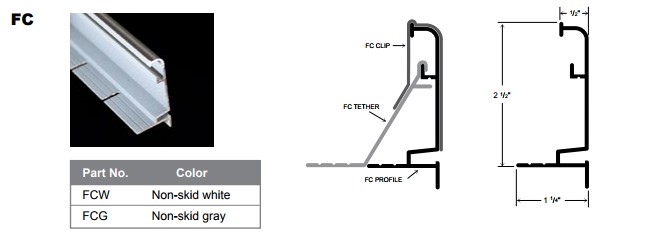
For flexible flat-faced coping (FCW or FCG), notice that these pieces are straight even for your corners as these bend to fit the desired radius of your pool's form, hence “flexible” foam forms. These will also come with tethers which are typically placed where joints connect in order to stabilize the coping however they can be placed anywhere needing additional stabilization.
Tethering
FC style coping is the only Bullnose coping that can be bent in the field. The un-notched will be used on straight sections and the notched used on radius and reverse radius.
All Tethers will be white since they will not be seen.
Though a hack saw will cut through most aluminum extrusions, a miter saw outfitted with an aluminum cutting blade is recommended for the most professional results.
CANTILEVER COPING/FLAT TRACK BEAD RECEIVER
If using cantilever/flat track coping use the notched pieces (or pre-bent pieces) to bend around the radius or radius corner.
The screws should be fastened every 12” (as a rule of thumb). It is important to have the track flush with each added piece of coping added. After the corners are secured, screw the long lengths of coping in place in the same manner.
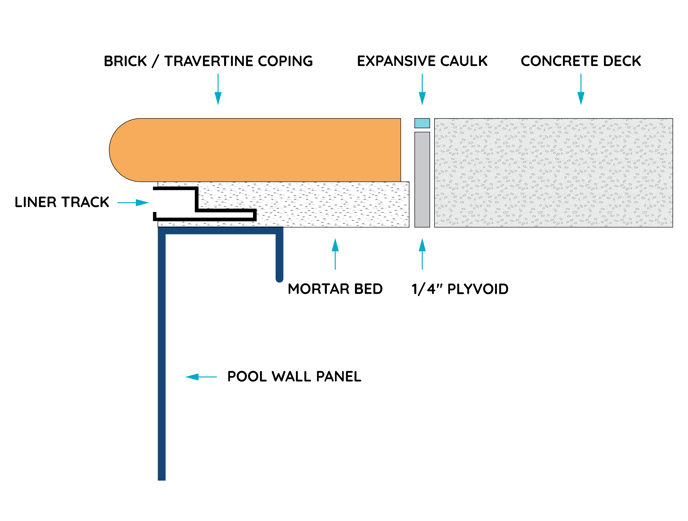
Make sure the liner receptacle on the lower edge of the coping is flush with the top inside edge of the pool walls. The track holds your liner in place. If using bricks, stone, travertine, etc. see the above diagram for an example of a commonly constructed deck design.
CANTILEVER COPING WITH FOAM FORMS
IMPORTANT
If using foam form coping, bottom preparation and liner installation become the last steps in completing your pool. Continue with “Pour the Concrete Footer” in this guide but look for another "IMPORTANT!" statement in that section. Come back to this section when you are ready to prepare the bottom of your pool. (Does not apply to Automatic covers.)
Due to the fragile nature of foam forms, we send additional pieces with your order. Trimming the edges of each piece may be required.
Once all other steps are complete and you are ready to prepare the bottom of your pool, (without your liner installed yet), peel the paper from the double-faced tape and stick the form to the panel with the form bead and plastic clips filling the liner opening.
This form bead keeps the liner clean during the pour. The plastic clips snap into the track locking the form in place every six inches. When attaching the form to the panel, be sure to use the palm of your hand making sure that the tape bonds well.
For additional insights on foam forms please watch the “Stegmeier Foam Deck Forms Installation” video.
For additional information on foam forms for steps, please watch "Stegmeier Foam Step Forms Installation” video.
Continue to the next installation step: How to Pour the Concrete Footing for your Inground Pool
Didn't find the answer you were looking for? You can always contact us at support@royalswimmingpools.com or choose the category below to see our most frequently asked questions for that topic: