How to Install your Above Ground Pool Wall
To aid the skimmer, position you’ll want to position the skimmer opening downwind from any prevailing winds your yard gets. Keep in mind that your pump and filter will also be located in the area so make sure they are positioned where you want them.
 WARNING! DO NOT ATTEMPT THE NEXT STEP IN WINDY CONDITIONS! THE WALL IS VERY HEAVY AND EXTREMELY DIFFICULT TO MANAGE ON A WINDY DAY. IF THE WIND DOES CATCH THE WALL DURING INSTALLATION, IT CAN CREATE DANGEROUS SITUATIONS AND/OR CAUSE DAMAGE.
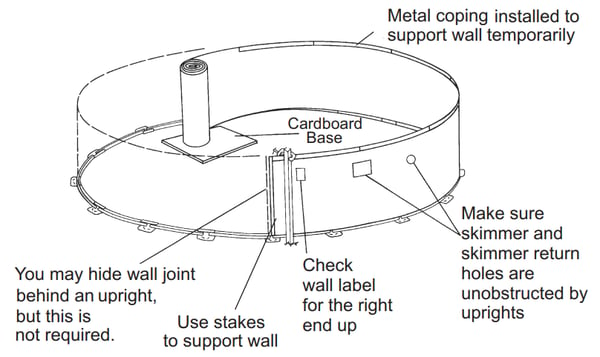
 PRO TIP: You can use the cardboard wall carton as a base to unravel the pool wall however using high quality plywood will make unrolling the wall around the pool perimeter much easier.
 IMPORTANT! The wall should either have “Up” arrows or a label to indicate which end of the wall is the top versus the bottom. This matters as your skimmer opening(s) have to be on the upper portion of the wall. If your wall is installed upside down you will have to undo your work and start over. Make sure the wall is right-side-up prior to moving forward.
To aid the skimmer, position you’ll want to position the skimmer opening downwind from any prevailing winds your yard gets. Keep in mind that your pump and filter will also be located in the area so make sure they are positioned where you want them to be.
- Locate the area that you wish to put the skimmer and return so that you can start the wall behind the appropriate upright.
- Unravel the wall a little at a time, inserting into the Bottom Rail’s grooves as you go and being careful to keep hands and feet from under the wall during construction. Do not unravel the entire wall at once, for this makes installation much more difficult.
| NOTE: |
| As you unravel the wall you will need something to hold it up. We recommend placing landscaping stakes around the outside of the pool and clipping the wall to the stakes as you go. If you cannot get landscaping stakes the other option is to temporarily install stabilizer rails and uprights to keep the wall in place. |


IMPORTANT! If the sidewall seems too long or too short, make the bottom ring larger or smaller by equally sliding the Bottom Rails in or out of the Bottom Plates. DO NOT make total changes on only 1-2 Bottom Rails.
If the ground is uneven, the wall may lift out of the bottom track. Correct this condition by rechecking your levels. Adjust as needed.
Continue to the next step: How to Assembly your Above Ground Pool Wall Joints
Or view our guide on the 17 steps to installing your Round Above Ground Pool here.
Didn't find the answer you were looking for? You can always contact us at support@royalswimmingpools.com or choose the category below to see our most frequently asked questions for that topic:
