Select Wilbar pool models (like our Saltwater Ultimate) come with a Stainless-Steel Wall-Saver Panel. The Wall-Saver Panel is a separate piece of the pool wall that has the skimmer and return openings in it.
On many Wall-Saver Panels, this means that one (1) of the wall joint areas will be exposed and clearly visible on the outside of the pool instead of being behind a pool upright. This is normal. See the image below.
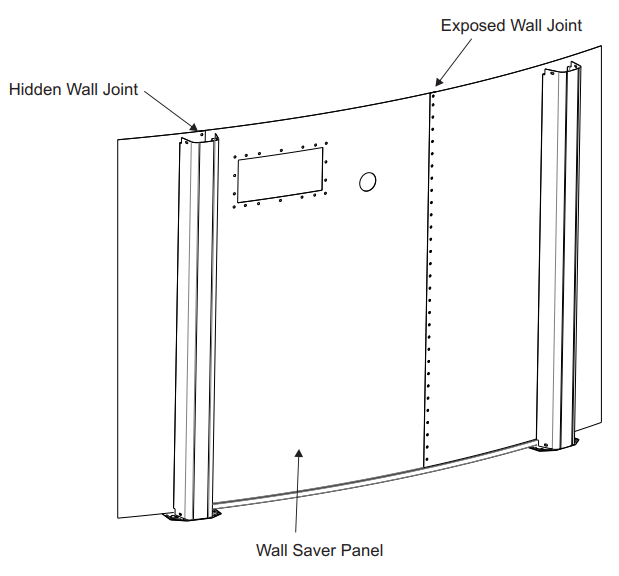
To install the Wall-Saver Panel, follow the instructions below: the wall-saver panel will act as the pool wall for these instructions and will connect to the pool at both points.
WILBAR WALL JOINT & WALL BAR ASSEMBLY
There are two different common kinds of wall bars. One has a single row of bolts with wall bars, and the other is a staggered double row pattern with wall bars. The installation is the same regardless of the wall bar type.
SINGLE ROW STAGGERED BOLT PATTERN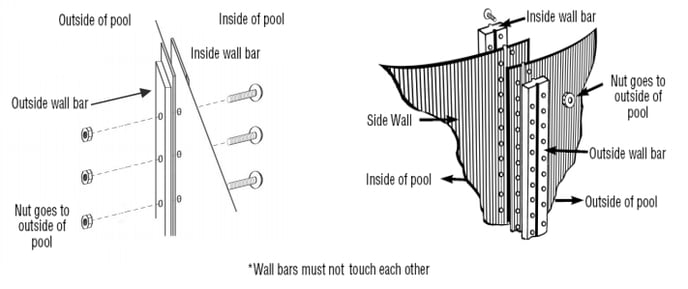
WARNING:Regardless of the wall bar type, when joining the pool walls together, make sure that the wall bars do not touch each other. See the illustration below.
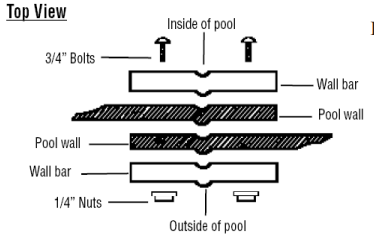
One wall bar must be inside the pool (the bolts will touch this bar) and one bar must be outside the pool (the nuts will touch this bar). The pool walls will be in the middle, aligned so that all holes line up.
Insert the bolts with the bolt head to the inside and the nuts to the outside of the pool.
Do not tighten until all bolts have been inserted.

PRO TIP: If your screwdriver slips and scratches the head of the bolt, file the scratch smooth so that it cannot puncture the liner. It is recommended that you cover the heads of the bolts (on the inside of the wall) with three layers of duct tape.
If the insertion of the wall in the bottom rail is tight at the point where the wall is joined together, insert a screwdriver and twist to make enough room, again being careful not to scratch the wall or the bottom rail.
IMPORTANT! All nuts should be as tight as possible using hand tools. Every hole from top to bottom of the wall/wall bar system must have a securely tightened nut and bolt. If you are missing any hardware, do not leave empty holes in the wall joint assembly. YOUR POOL WILL BREAK!
View our guide on the 17 steps to installing your Round Above Ground Pool here.