Overlap Liners Just as the name suggests the liner literally overlaps/drapes over the side of your pool wall and is then secured by the pool's top rails. This is also the kind of liner you'll end up with with you're looking to install an above-ground pool with a deep end.
This guide is meant to provide additional resources gathered over the years from Royal Swimming Pools installation team. It does not replace your manufacturer’s liner installation instructions. Refer to them first.
 IMPORTANT: Before opening your liner box, check the label to confirm that the liner is the proper size and pattern. If it is incorrect, DO NOT open the box. Contact your supplier immediately.
There are several steps that are the same regardless of the size or shape liner you have. Before installing your liner, the pool needs to be built to where only the small stabilizer rails and top plates are installed. Having the top plates loosely installed with a single screw will make adjusting the liner quicker. The wide top rails are not needed yet. All uprights should be installed, and you should double check the roundness of the pool by taking cross measurements in several places.
 IMPORTANT! The liner is not a structural part of the pool. Its purpose and design is to form a water seal. Water pressure is held by the pool wall and frame and not by the liner. A properly installed liner must be supported by the ground, cove and the pool wall. An improperly installed liner will not support the weight of the water, resulting in a blowout, which is not covered by the warranty.
 PRO TIP: Give yourself plenty of time. This can be done in as little as an hour, or we’ve seen it take as long as 4 hours depending on the liner’s fit and how much help you have.
PREPARING THE LINER TO BE INSTALLED
Install the liner on a warm, windless day. A warm liner is much easier to work with. The ideal temperature is 60⁰-95⁰ F. When too hot, the liner becomes easy to over stretch or puncture. If the liner core temp is too low, it can crack in the folds. Storing the liner in temperatures lower than 55⁰F is not recommended for this reason. After you have checked the label for size, print, and style accuracy, open your liner box carefully so the liner is not damaged. Do not use sharp objects to open the liner box. You can unfold the liner inside the pool, or outside on the grass. Make sure there are no sticks, rocks, metal pool parts, or sharp items in the area that can puncture your liner.
PRO TIP: If cooler, warm the liner in advance in a climate-controlled room. Take the liner out of the box (after checking the label for accuracy) and unfold a few folds. This will allow the liner’s temperature to be raised and make it easier to work with.
.png?width=165&name=Roy%20Bot%20%20(13).png) Note: Installing the liner is easier with multiple people. Time to call in some friends. 2 people at minimum.
Note: Installing the liner is easier with multiple people. Time to call in some friends. 2 people at minimum.
- Spread the liner around the inside of the pool. If you are doing this from inside the pool, step lightly to minimize footprints in the sand, or make cardboard snowshoes with duct tape. Again, no sharp items.
- Starting at the liner’s wall seam, place the liner on the top of the pool wall with the print side facing up and the flaps for the seams facing down. Do not take apart the rails at this time.
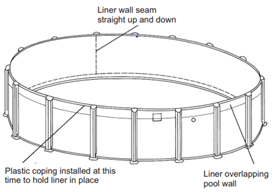
- Hang the liner over the wall making sure that the seam is straight up and down, perpendicular to the floor. This will assure you that the liner begins going over the wall straight.
IMPORTANT! Do not place the liner’s wall seam over the skimmer or skimmer return cutouts. As you work, inspect the liner’s wall and floor seam to ensure there are no openings. If you find an open seam, contact your supplier immediately.
INSTALLING THE LINER
Identify the floor seams in the liner. Oval liners typically have two seams that run the length of the pool. They are not in the center of the floor but each one is off-center to either side. Use these seams to help install the liner squarely within pool.
IMPORTANT: Do not place the liner’s vertical wall seam directly over the skimmer or skimmer return cutouts if possible. At this point, if the liners main vertical wall seam lines up on the skimmer or return, the best option is to rotate the liner 180 degrees and put the wall seam on the other end of the pool. This will keep it from interfering with gasket seals for the skimmer or return.
Do not take apart the stabilizer rails at this time. Spread the liner around the pool evenly and (using the two floor seams) try to center the floor in the oval shape of the pool as best as possible.
There are a few ways to line the floor seams up with the pool.
One way is to find and mark the center of your pool frame with an alligator clip or clothes pin on each end. This will be the center on the rounded ends, not the straight sides. Then measure the distance between the two floor seams. Then divide that measurement in half. EXAMPLE: if the distance between Floor Seam A and Floor Seam B is 5’ (or 60”), divide 5’ in half and you get 2.6’ (or 31.2”). Then measure 2.6’ from either floor seam (A or B) towards the center of the pool. This is the center line of your oval liner. Measure that distance (2.6’, in our example) in towards the center of the pool in several places, and make sure the center line of the liner is aligned with the center of your pool frame. *The numbers provided in the example above are for demonstration purposes only. You will have to take your own measurements as these distances vary from liner brands, types, and pool sizes.

Another way is to use the uprights as guides however, this requires the uprights to already be vertically level for accuracy. Make sure the seams measure the same distance from the uprights. 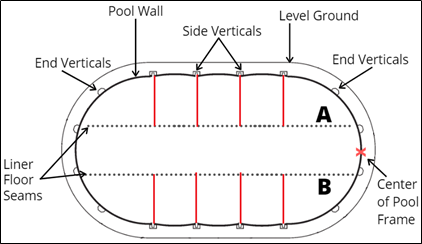
The longer you spend centering the liner in the pool, the less chance you’ll have to take it down and rotate, essentially starting over. Once the liner is positioned where you want it, proceed below.
 Once the liner is positioned properly, have helpers hold the liner on the wall in 3-4 places. If you are short on help, use alligator clips with pieces of cardboard (so the clips don’t put too much pressure on your liner).
PRO TIP: Manufacturers provide slightly different amounts of liner to be overlapped over the pool. To find the amount of liner you should be overlapping, find the seam that connects the wall of the liner to the floor of the liner. Position it just about to the top of the pool cove. By the time the liner is completely installed, you’ll see if you need to let more overlap back in or pull some extra out.
Begin at the center of one end of the pool and use the seams you previously identified as a guide when you hang the liner on the pool wall. Hang 4-6 feet of liner around the end of pool and add the coping strips to hold that portion of the liner.
Once this section of liner is set, measure the amount of overlap hanging on the outside of the pool. Assuming the cove and floor are level, the overlap amount should measure the same around the entire pool. This will help keep your floor seam in the same location. Periodically, check this measurement as you continue working for an easier and more accurate install.
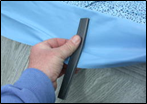
PRO TIP: Once you get the first liner section hung, cut a piece of the coping the same length as the liner overlap. Use this cut piece of coping as a quicker way to measure your overlap as you work around the pool.
Work 3 sections of railing at a time, adjusting the liner overlap so the floor seam is just above the cove, using the plastic coping strips to keep the liner in place as you go, and replacing the top rails and plates as you move.
IMPORTANT: Once you get 3 sections forward, replace the 3 behind you, then remove the 3 top stabilizer rails ahead of you. DO NOT add the wide top rails yet.
Since you started in the center of one end of your pool, you will want to move outwards from that point in both directions. Move in one direction until you get to the straight side part, then go back where you started and move the other direction. The goal is to get the liner hung on both rounded ends of the pool end in order to check the fitment.
PRO TIP: Make sure not to bunch up the liner on the wall around the perimeter. Just like pulling a shower curtain, you want to pull the top of the liner around the pool with you as you go to pull out the slack in the liner. Don’t pull too hard and stretch the material, instead pull just enough to get the shower curtain like wrinkles out of the liner wall.
Once the liner is completely hung over one round end of your pool, stop and use a soft bristled shop broom or your pool brush to pull the floor of the liner up to the wall. You’re looking for visible signs that the liner’s roundness on that end matches the roundness of your pool. If the liners floor seams are not evenly splitting the center point of the pool, you’ll want to “rotate” the top of the liner to make them center.
Example, if you measure the distance each floor seam is off the center point, and one of them is 4” further than the other, you need to rotate the liner 2” back towards the center line. This will split that difference between the 2 seams, taking 2” from one measurement, and adding 2” to the other. Repeat this process until you are satisfied with the fit on this end.
Once satisfied with the fitment, continue working around the perimeter of the pool and hanging the liner, making sure you have the same amount of overlap as you go.
When initially setting up your pool, the perimeter length of the liner and the perimeter length of the pool may differ slightly. As you get closer to completing the liner install, you’ll be able to tell if you need to make any adjustments based on having seemingly too much or not enough liner.
PRO TIP: Liners are made to be carefully stretched up to approximately three feet. Don’t panic if you checked your label for correct sizing and it still seems like your liner is too small or doesn’t have enough material to make it around your pool. Warm the liner to make it easier to stretch.
- SEEMS LIKE NOT ENOUGH LINER: Instead of removing the slack like you have been doing, now you need to actually pull the liner to stretch it to make the entire perimeter bigger. You’ll want to stretch the liner as evenly as possible to keep from over-stretching one area too much. Work mindfully so the liner doesn’t tear. Over stretching will void the warranty. Any excess stretching will shorten the useful life of the liner.
- SEEMS LIKE TOO MUCH LINER: Instead of pulling on the liner, start compressing it slightly. Check that the liner floor seam is still running evening in the middle of your cove. If not adjust the liner accordingly. You may end up with extra overlap in one area. Keep working the liner around the pool until you have a comfortable fit with few to no vertical wrinkles. Small wrinkles can be worked out in a later step.
 Before moving on, the liner should be fully secured with coping strips around the pool wall, and any areas that have slack or not enough material need to be addressed using the above methods.
From here you need to check that the center of the liner floor is centered with the floor of the pool as best as possible. Depending on how much the liner was moved while hanging it, the floor could have been rotated slightly out of the center.
You can tell if your floor rotated if you have vertical wrinkles in the wall that are twisting in one direction instead of straight verticals.
 To fix a rotated liner floor, stand on the outside of the pool and reach over the ledge with a soft bristled brush or shop broom. Pull back on the floor of the liner (around the cove area) to help center and position it as needed. When finished, the liner should be fairly centered, with very little rotation if any. After making adjustments, the floor seam may end up above or below the cove, and either is fine at this point.
PRO TIP: A key indicator of how your liner is positioned compared to the shape of your pool is the rounded ends. Pay attention to the opposite corners of the pool. Even though there aren’t any real corners, oval shapes can still be squared up like when you made sure the bracing was square installing the pool.
If your 4 corners look the same, and the floor seams look straight, then you should feel confident in your install. If you have 2 corners opposite each other that are tight, and 2 corners that are loose, then the liner is most likely out of rotation with the pool. If this is more than just a slight difference, you may want to correct it. If you’re not sure, you can continue forward as the next steps may require some more adjustment. If so, you can correct both issues at the same time.
PRO TIP: It’s not uncommon to have to adjust an oval overlap liner 3-4 times, but with repetition comes speed. It’ll get faster every time.
After making adjustments, the floor seam may end up above or below the cove, and either is fine at this point.
FINAL INSTALLATION STEPS
The follow final steps are the same regardless of your pool shape.
AIR GAP ADJUSTMENTS
The liner should look a little smaller than the pool as you want a small air gap around the cove (approximately 3-7”). If you have too much liner inside the pool it will not have this air gap. You’ll need to overlap more liner over the pool wall. If you have too much of an air gap, you have too little liner inside the pool and will need to let some of the overlap back into the pool. Both scenarios require you to move around the pool again to adjust the liner evenly. Follow the same pattern around the pool as before.
USING A SHOP VAC
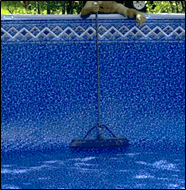
A Shop Vac will “vacuum fit” the liner to the pool’s shape. This is helpful for evenly stretching the liner into place both on the floor and the wall, helping to eliminate wrinkles.
PRO TIP: You may see “creases” from where the liner was folded. These aren’t wrinkles. Sunlight and water pressure will flatten these out.
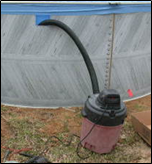
Place the Shop Vac on a steady surface outside the pool, close to the skimmer opening. Insert the vacuum hose into the skimmer opening of the pool until the hose is roughly 4-6” above the pool’s cove.
Turn the vacuum on. Use a soft bristled brush or broom to help work wrinkles out. As you work, pay attention to the air gap at the bottom of the wall, above the cove. You want the air gap to be somewhat uniform around the pool to avoid creating more wrinkles.
PRO TIP: Sometimes when you get really strong suction from a vac, you can’t get the wrinkles out. If this happens, just shut off the vac, quickly make the adjustments, then turn the vac back on. If you aren’t getting enough suction, take strips of duct tape and cover the openings on the skimmer hole and return fitting hole to create an air seal, making the vacuum more airtight.
There should not be any wrinkles, however, there will most likely still be a very small air gap between the liner and the cove. 3-5” is ideal, but a little more is ok. The liner will stretch in place further once water is added.
Make sure your liner is in position to withhold the last bit of stretch it will endure. On a warm sunny day, it will stretch more than a cool cloudy day. Some manufacturer’s liners will stretch more than others as well.
The way to know if your liner will withhold is to test push the liner down on the cove. If you can push and stretch it to the cove by hand, it is within the capabilities of the liner to make this last stretch into place. If you have to push really hard, but can still touch the cove behind the liner, consider the weather. If the temperature is cool, consider letting a little material back in the pool. If it’s warm (60 degrees F or up), it will typically stretch into place without having to let material back in the pool.
IMPORTANT: You can damage the pool or liner if the liner is too tight after water is added. The liner can rip, or if it’s a really strong liner, it can pull a fully assembled pool wall down. The liner is not a structural part of the pool. Its purpose and design is to form a water seal. Water pressure is held by the pool wall and frame and not by the liner. A properly installed liner must be supported by the ground, cove and the pool wall. An improperly installed liner will not support the weight of the water, resulting in a blowout, which is not covered by the warranty.
ADDING WATER
Get any wrinkles you can’t live with worked out before filling the pool with water. Your pool will still hold water with wrinkles in the liner and you should not risk damage by draining the pool to remove wrinkles.
IMPORTANT: If you add water and the liner isn’t fitting right, you can face irreversible problems.
When you are 100% satisfied with the liner placement, you are ready for water. Keep the vacuum on until the water reaches just below to the Shop Vac hose on the wall. Turn off the vac, take off any tape you added, and remove the hose. If you are using a water truck or other fast water delivery system, you need to pay close attention to the pool walls while filling. Liners want to stretch slowly, so fast fills can cause problems if not monitored. Problems are uncommon but possible depending on how tight your liner is. Take care not to put a divot in the pool floor, which can occur when too much water force is aimed at the same area.
Complete the final steps on installing your swimming pool using your manufacturer’s installation manual.
Didn't find the answer you were looking for? You can always contact us at support@royalswimmingpools.com or choose the category below to see our most frequently asked questions for that topic: