| NOTE: |
| Depending on your pool brand and model, the Bottom Plates may be called Base Plates, Bottom or Base Cuffs, or Vertical End Caps. For this guide, we’ll use the term Bottom Plate. |

IMPORTANT: Make sure you are using the bottom rails and not the inner stabilizer bars. The stabilizer bars are always metal and they have a male end and a female end. The bottom rails are the larger width rails that have the straight cuts on both ends. The bottom rails do not interlock.
WARNING: The Bottom Plates can have sharp edges. Work carefully.
- Use your pool parts breakdown sheet to separate all pool components, and ensure you have the correct number of pieces required before starting.
- Take the curved Bottom Rails and lay them out in a circle along the circumference of the pool area. There will be a Bottom Plate in between each Bottom Rail.
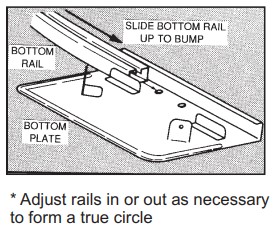 Assemble the Rails (groove up) by using the Bottom Plates to join the rails together. Slide the Bottom Rail into the Bottom Plate until the Rail stops at the dimple on the Plate. The Rail needs to be inserted all the way to but not exceeding the dimple for the pool’s diameter to be correct. Rails can be squeezed between thumb and forefinger to help make sliding them into the Bottom Plates easier. Make sure that the larger portion of the Bottom Plate is on the outside of your circle.
- DO NOT SKIP THIS STEP! The rails do not automatically form a true circle. If not adjusted, it could end up causing problems later on. Check your circle by measuring the diameter across several locations. Adjust the pool so that each measurement from the center stake to the Rail or Plate equals the proper radius (See page 4.) Once you have formed a true circle, stake the Bottom Rails (inside the pool and out) at every other rail to make sure they do not move out of place. Be careful not to scratch the rails.
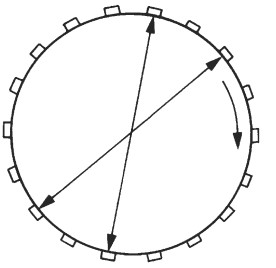
| FOR POOLS WITH AN ODD NUMBER OF BOTTOM PLATES |
|
Measure from Bottom Plate to the center of the opposite bottom rail at every other Bottom Plate. When true, stake into position.
|

| FOR POOLS WITH AN EVEN NUMBER OF BOTTOM PLATES |
|
Measure from Bottom Plate to an opposite Bottom Plate at every other plate. When true, stake into position.
|
 PRO TIP: At this point in the project, you’ll want to confirm the pool area is level. To do this, place your level on top of each Bottom Rail to be sure the ground is flat within 1/2” of the bottom rail directly across from it.
Continue to the next step: How to Install your Above Ground Pool's using Patio Blocks
Or view our guide on the 17 steps to installing your Round Above Ground Pool here.
Didn't find the answer you were looking for? You can always contact us at support@royalswimmingpools.com or choose the category below to see our most frequently asked questions for that topic: