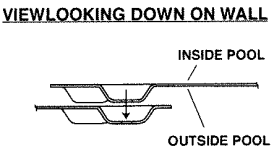
Place the grooves at the end of the walls together so they are flush. See the illustration below.
|
NOTE: |
|
|
If any adjustments are needed to allow your pool wall to connect properly, make these adjustments by equally sliding each individual Bottom Rail as needed. Do not make the adjustments needed by only sliding one or two Bottom Rails. As this could cause pool failure. Distribute the efforts evenly. |
|
|
Pool Walls Overlapping Too Much? |
Slide your Bottom Rails AWAY from each other more. |
|
Pool Walls Do Not Meet? |
Slide your Bottom Rails CLOSER to each other more. |

IMPORTANT: If you have a Wilbar brand swimming pool, see appendix D for how to join your pool walls using their included Wall Bars as well as appendix E for installing a Stainless-Steel Wall-Saver Panel. The Wall-Saver Panel is only used on select Wilbar models.
- Line up the holes at each end of the wall and insert ½” long screws into the pool wall from inside the pool (so the screw heads are on the inside the pool).
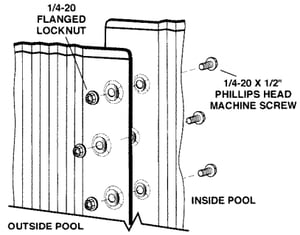
- Loosely attach all the screws and nuts.
- Once all the holes are filled with screws and nuts, go back and tighten them securely. Then recheck the tightness of the screws and nuts at least twice to ensure a proper connection.
- SEE THE PRO TIP BELOW FIRST. Place the protective wall strip* and cover the screw heads with three layers of duct tape. This protects your liner from being punctured.
- Recheck your pool for roundness. Measure from the center stake to the pool wall and adjust until the distances are equal. Be careful not to damage the bottom rails.

PRO TIP: File off any sharp edges on the screw heads
 IMPORTANT: All wall assembly holes must be filled. All nuts should be as tight as possible using hand tools. The ends of the pool wall should be overlapping. Failure to complete one or all of these will result in an installation error and any resulting damages will not be covered by your warranty.
Continue to the next step: How to Assembly your Above Ground Pool Vertical Supports.
Or view our guide on the 17 steps to installing your Round Above Ground Pool here.
Didn't find the answer you were looking for? You can always contact us at support@royalswimmingpools.com or choose the category below to see our most frequently asked questions for that topic: