
PRO TIP: Install the liner on a warm, windless day. A warm liner is much easier to work with. The minimum temperature should be 65 degrees. If lower, try to warm the liner first.
Open your liner box carefully so the liner is not damaged. Do not use sharp objects to open the liner box.
Check the pool floor for levelness. Remove all stones and sharp objects to keep your liner from being punctured. Fill in any footprints and depressions with sifted earth and tamp level. If you have been using a ladder for access over the pool wall, remove it at this time.
| Note: |
| Installing the liner will require multiple people. Time to call in some friends. |
The next installation steps are the same regardless of which liner type you have. As we cover more steps below, we'll break out where you'll see differences based on your liner type: Overlap, Beaded, or Unibead.
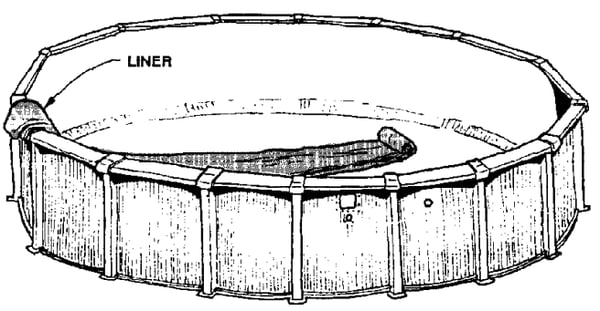
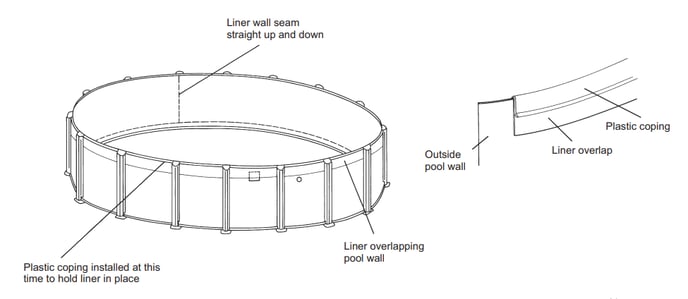
- Starting at the liner’s wall seam, place the liner on the top of the pool wall with the print side facing up and the flaps for the seams facing down.

IMPORTANT! Do not place the liner’s wall seam directly over the skimmer or skimmer return cutouts.
- Hang the liner over the wall making sure that the seam is straight up and down, perpendicular to the floor. This will assure you that the liner begins going over the wall straight.
- The liner should have the loose end overhanging the outside of the pool by approximately 12”.
- Hold the loose end and unfold the liner down and across the middle of the pool.
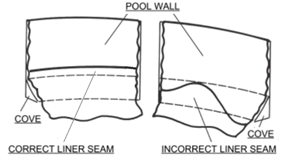
- Spread the liner so that the seam going around the circumference of the pool base is resting on the cove evenly around the pool. See the diagram.
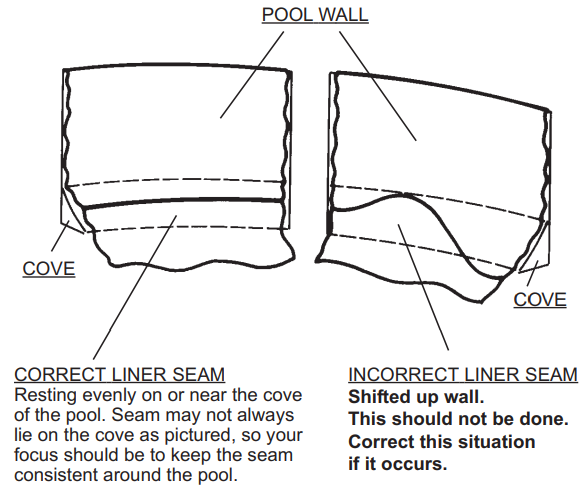
The seam should not be up on the wall, on the pool floor, or shifted to one side. These conditions will cause tightness or stretching of the liner when the pool is being filled.
PRO TIP: Liners are designed to be able to stretch, however, you want to do this mindfully and gently in order not to rip your liner in the process. Again, installing your liner on a warmer day will allow you to stretch the liner more easily.
There are three types of liners used for Above Ground Pools:
- Overlap
- Beaded
- UniBead Liners (also known as J-Hook Liners).
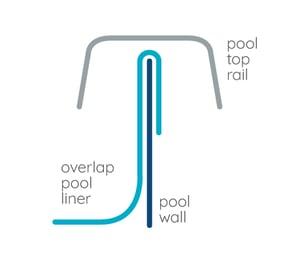
The liner literally overlaps/drapes over the side of your pool wall and is then secured by the pool's top rails.
TIP: If your pool has a deep end, you’ll have an overlap liner. Specifically, an expandable liner. These can range in depth from 60" to 80"+ with the most common being 72". Please note no other liner type will allow for a deeper end in your pool. See more on deep end above ground pools here.
You can skip to the instructions for overlap liners here.
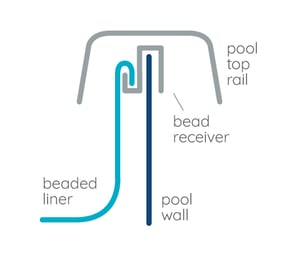
The liner snaps into a bead receiver or track that runs around the top inside portion of your pool.
You will have to had to of ordered the bead receiver or bead track along with your kit in order to install your liner as a beaded liner does not automatically come with it.
If you ordered your pool kit from Royal Swimming Pools, however, these will have been included with your kit automatically if you chose a beaded liner.
You can skip to the instructions for beaded liners here.
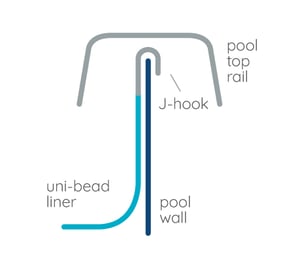
UniBead liners are the most popular liner choice for above ground swimming pools.
You can install Unibead, or J-Hook/V-Bead, in 2 separate ways: as a standalone J-hook shown here where you simply "hang" the liner on the wall. Or as a Beaded Liner with a bead receiver as shown under "beaded Liner".
You can skip to the instructions for unibead liners here.
Depending on your liner type follow the appropriate step below:
OVERLAP LINER INSTALLATION INSTRUCTIONS

Spread the liner evenly around the pool and center the floor in the middle of the pool. Once the liner is positioned properly, have helpers hold the liner on the wall in 3-4 places. If you are short on help, use alligator clips with pieces of cardboard (so the clips don’t put too much pressure on your liner).
 Start by taking 3-4 top stabilizer rails off the pool and “hanging” the liner over the wall. You can do this with approximately one foot of liner hanging (or overlapping) on the outside of the pool wall. Spread out about 4-5 feet of liner around the top of the pool wall to start.
From here, visually locate the seam where the wall portion of the liner and floor portion of the liner meet. Adjust the liner so this seam is located just at the top of your pool’s cove.
You adjust the liner by either pulling more liner over the pool wall or letting some of the overlap back inside the pool.
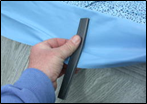
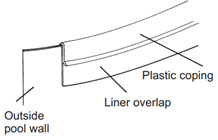 Once the seam is where it needs to be (just above the pool cove), place your coping strips on top of that portion of the liner. The coping strips slide over the liner on top of the pool wall to secure the liner to the wall. An alligator clip or a person to just stand and hold the section where you started will be helpful as you go around to maintain wall stability and keep the liner from coming unclipped.
 PRO TIP: Once this section of liner is set, measure the amount of overlap hanging on the outside of the pool. Assuming the cove and floor are level, the overlap amount should measure the same around the entire pool. This will help keep your floor seam in the same location. Periodically, check this measurement as you continue working for an easier and more accurate install.
 PRO TIP: Once you get the first liner section hung, cut a piece of the coping the same length as the liner overlap. Use this cut piece of coping as a quicker way to measure your overlap as you work around the pool.
Work 3-4 sections of railing at a time, adjusting the liner overlap so the floor seam is just above the cove, using the plastic coping strips to keep the liner in place as you go, and replacing the top rails and plates as you move.
PRO TIP: This is easier with at least 3 people. Person one will hang/adjust the liner and set/check overlap amount. Person two will disassemble the top stabilizer rails and plates as you go. Person three will put on the coping strips and reassemble the top rails and plates.
 IMPORTANT! If you do not have extra help, once you get 3 sections forward, replace the 3 behind you, then remove the 3 top stabilizer rails ahead of you. DO NOT add the wide top rails yet.
As you move around, you want to make sure not to bunch up the liner on the wall around the perimeter. Just like pulling a shower curtain, you want to pull the top of the liner around the pool with you as you go to pull out the slack in the perimeter of the liner. You don’t want to pull too hard and stretch the material, instead pull just enough to get the shower-curtain-like wrinkles out of the liner wall. These are vertical folds or wrinkles on the inside of the pool wall.
When initially setting up your pool, the perimeter length of the liner and the perimeter length of the pool may differ slightly. As you get closer to completing the liner install, you’ll be able to tell if you need to make any adjustments based on having seemingly too much or not enough liner.
PRO TIP: Liners are made to be carefully stretched up to approximately three feet. Don’t panic if you checked your label for correct sizing and it still seems like your liner is too small or doesn’t have enough material to make it around your pool. Warm the liner to make it easier to stretch.
- SEEMS LIKE NOT ENOUGH LINER: Instead of removing the slack like you have been doing, now you need to actually pull the liner to stretch it to make the entire perimeter bigger. You’ll want to stretch the liner as evenly as possible to keep from over-stretching one area too much. Work mindfully so the liner doesn’t tear. Over stretching will void the warranty. Any excess stretching will shorten the useful life of the liner.
- SEEMS LIKE TOO MUCH LINER: Instead of pulling on the liner, start compressing it slightly. Check that the liner floor seam is still running evening in the middle of your cove. If not adjust the liner accordingly. You may end up with extra overlap in one area. Keep working the liner around the pool until you have a comfortable fit with few to no vertical wrinkles. Small wrinkles can be worked out in a later step.
 Before moving on, the liner should be fully secured with coping strips around the pool wall, and any areas that have slack or not enough material need to be addressed using the above methods.
From here you need to check that the center of the liner floor is centered with the floor of the pool as best as possible. Depending on how much the liner was moved while hanging it, the floor could have been rotated slightly out of the center.
You can tell if your floor rotated if you have vertical wrinkles in the wall that are twisting in one direction instead of straight verticals.
 To fix a rotated liner floor, stand on the outside of the pool and reach over the ledge with a soft bristled brush or shop broom. Pull back on the floor of the liner (around the cove area) to help center and position it as needed. When finished, the liner should be fairly centered, with very little rotation if any. After making adjustments, the floor seam may end up above or below the cove, and either is fine at this point.
UNIBEAD LINER (J-HOOK) INSTALLATION INSTRUCTIONS
With a unibead liner, you will not use the plastic coping strips that are packed in the parts carton of your pool. You can discard those pieces if they are included as they only apply to pools with overlap liners.
UniBead liners can be used in two ways; either as a traditional Beaded Liner in a swimming pool that uses a Bead Receiver or as a J-Hook Liner in a pool that does not use a Bead Receiver. We have included both installation techniques below.
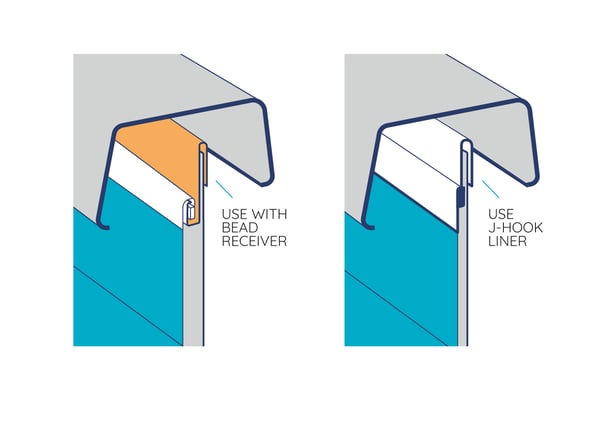
J-Hook Without Bead Receiver
Simply open up the bead with your fingers and hang the liner directly on top of the pool wall.
When this is done properly, the only portion on the outside of the pool wall is approximately 1" of the J-Hook. No printed liner material is going over the top of the wall to the outside of the wall.
Make sure the bead is on evenly around the entire pool, and that the liner is hanging straight down from the top of the wall (no diagonal wrinkles).
If the liner is twisting, it is because it is not sitting properly in the pool. Make necessary adjustments before proceeding.
Unibead as a Traditional Beaded Liner with a Bead Receiver
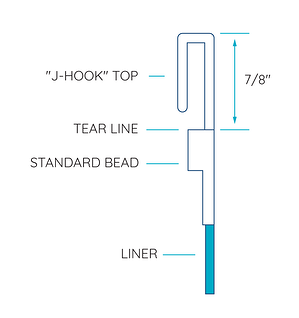
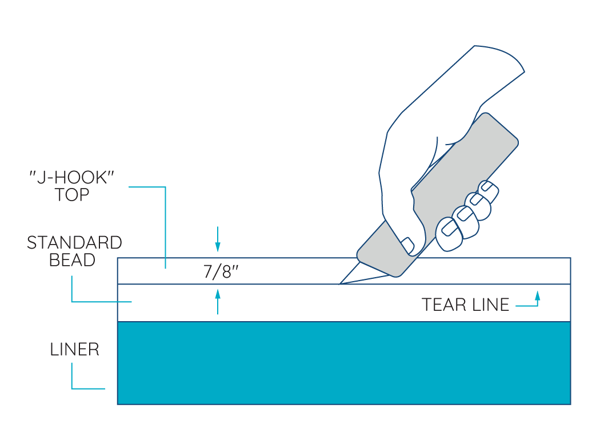
To use with a bead receiver, you must trim off the J-Hook Top portion of the UniBead system. See image.
Using a Utility Knife/Box cutter, CAREFULLY slice in between the grove already existing on the Unibead Tear Strip (just above the rectangular beaded portion), approximately 7/8" from the top of the bead.
See below.
Then simply separate the J-Hook section from the Liner by tearing along tear line all the way around the liner.
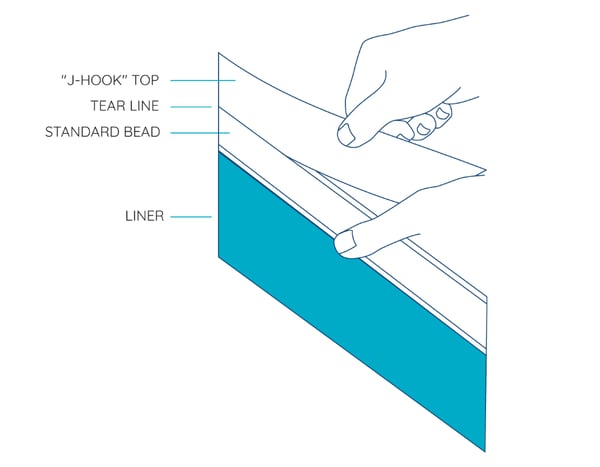
You'll be left with a Standard Bead. Discard the separated J-Hook section. Install as conventional Beaded Liner (see “Beaded Liner” below).
BEADED LINER
With a beaded liner, you will not use the plastic coping strips that are packed in the parts carton of many pools. You can discard those pieces if they are included, as they only apply to pools with overlap liners. Instead, you should have received a beaded liner track.
The beaded liner track should be installed onto the pool wall all of the way around the pool.
These pieces should be as close together as possible since leaving spaces between bead tracks can cause liner problems down the road.
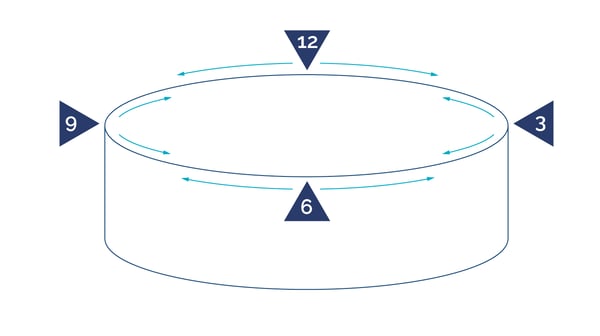
Once all of the beaded liner track is on the wall, you snap the liner’s bead into the liner track at four points around the pool; at the 3, 6, 9, and 12 o'clock positions.

PRO TIP: You can use masking or electrical tape, if necessary, to hold the liner in place.
Make sure that you attach the liner wall perpendicular to the floor of the pool. If you have someone else helping you, start from two opposite positions (9 and 3 or 12 and 6) and work the liner onto the wall from each until they come together.
WARNING! If you do not attach the liner to the wall in this manner, one of two situations will likely occur. Either you will have an excess of material or flap around the wall or you will be short and have to stretch the material to make it fit properly. While liners are designed to be able to stretch, you want to do this mindfully and gently in order not to rip your liner in the process.
Situate the liner within the pool until you are satisfied that the liner appears to be evenly distributed. If there are wall wrinkles, shift the liner in the track until the liner is even. Then continue snapping the remainder of the liner into place around the pool.
IMPORTANT! Go around the entire pool again making certain that the liner is securely snapped into the track. This is important to confirm so that the liner does not pull out while under the pressure of being filled with water.
Continue to the next step: How to Adjust your Above Ground Pool Liner
Or view our guide on the 17 steps to installing your Round Above Ground Pool here.
Didn't find the answer you were looking for? You can always contact us at support@royalswimmingpools.com or choose the category below to see our most frequently asked questions for that topic: