POSSIBLE TOOLS:
- Drill
- Rope
- C-Clamp
- Rebar Stakes
TIP
Be sure to place the skimmer and return inlets in the desired location. IMPORTANT: Make sure the skimmer is at least 4 feet away from a corner. Installing the skimmer too close to a corner, especially one with a 6" radius, will cause problems.
The step takes the place of any wall panel of equal size on the dig spec.
Panels of the same size and radius are interchangeable.
THE SKIMMER AND RETURN INLET PLACEMENT
The desired placement of the water recirculation inlet fittings (returns) and skimmer may be marked on the swimming pool construction plan.
It is best to place the skimmer near the center of one of the long sides of your pool and downwind of the generally prevailing breeze direction experienced in this area. This will enable the wind to help direct surface dirt and debris to the skimmer for removal from the pool.
Pools with 2 skimmers can locate them on the same side or on opposite corners.
In addition, thoughtful consideration should be given to the circulation pattern of the water when placing inlets. Strive to eliminate all dead spots in corners by evenly spacing the returns for maximum coverage.
On diving pools, a safety rope with floats must be anchored to each side of the pool a minimum of one foot, but no more than two feet, into the shallow end from the breakover. With that in mind, be certain that the skimmer opening will not be in line with or near the rope and floats.
NON-VINYL COVERED STEPS
TIP
Vinyl liners designed for vinyl over steps (VOS) application requires the locating and fitting of the step(s) before any of the shallow end wall bead is put into place. The use of sandbags or water tubes is often necessary to hold VOS liners in position
When using steps, individual manufacturer instructions should be followed for proper installation procedures for the step ordered with your pool kit. The step instructions are attached to the steps along with the faceplate screws.
When deciding where to place your step, keep in mind that step(s) should not go past the shallow end breakpoint.
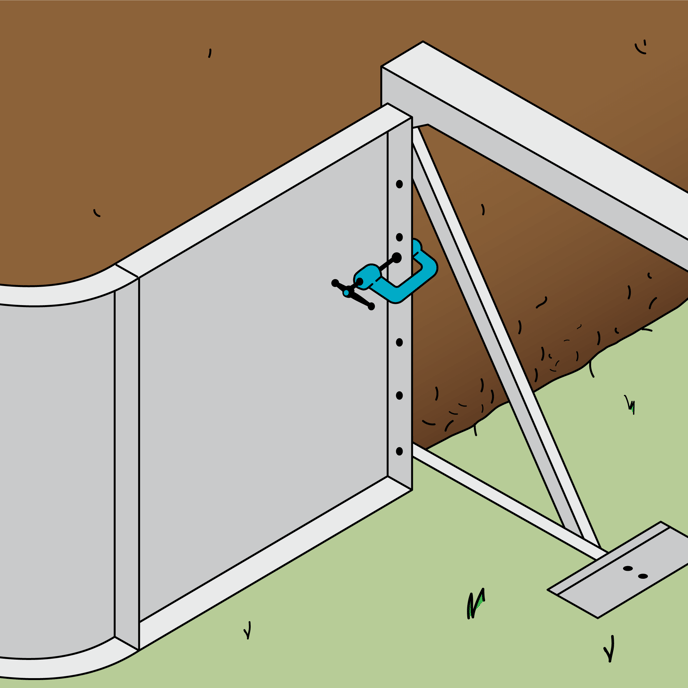
Position the step unit in its desired location within the pool frame. Temporarily secure the step flanges to the wall flanges with C-Clamps as shown here.
Working one side at a time, adjust the position of the step to ensure that the top of the step will be level with the top of your coping (NOT the top of your wall panel). This level can be equal or slightly greater than the maximum height of the coping that will be used.
- Bullnose Steps: The top of the step should be flush with the top of your bullnose coping. Since actual coping size can vary you should measure the coping or actually place the coping on the wall before drilling the attachment holes.
- Cantilever Steps: The top of the step should be flush or slightly higher with the top of the wall panel.
Once your step is aligned correctly in relation to your wall panels, clamp the step in place securely. Using the holes in the wall flange as a template, drill the matching hole into the step flange. Secure the wall panel and step together in these locations with bolting.
IMPORTANT!
The bolt heads, with an oversize washer under them, MUST be on the step side of the flange assembly.
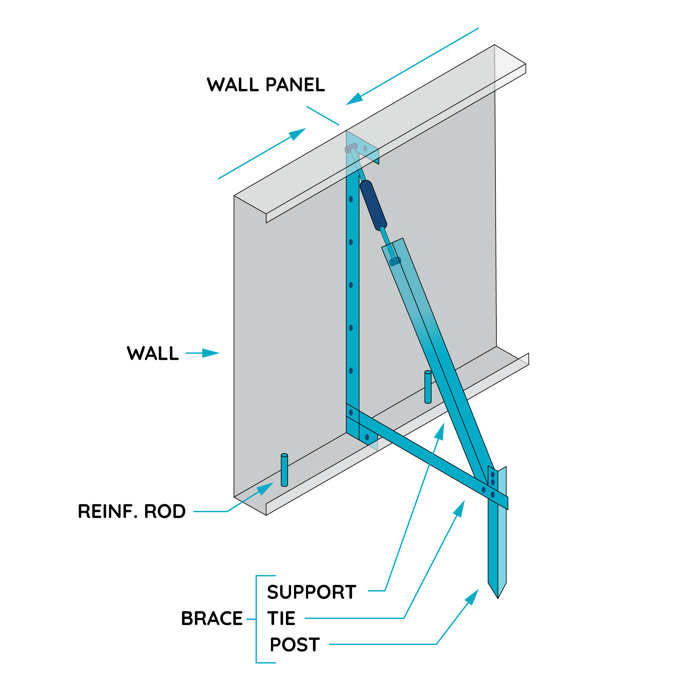
The back of the step must be supported. Supports can also be used to level the step as well. The step should be leveled to the same slope as the deck which will slope away from the pool.
The step supports typically come in one of two forms: A Brace or a Pole
BRACE STEP SUPPORT
POLE STEP SUPPORT
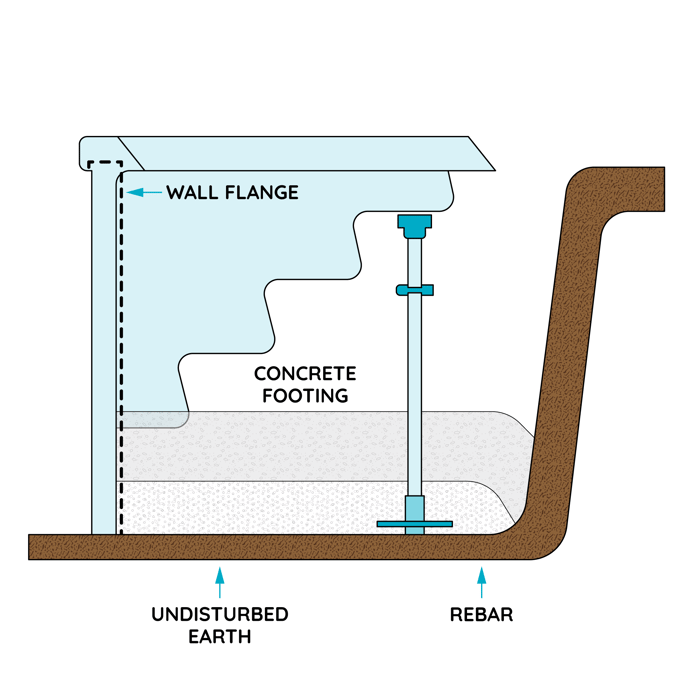
For Pole Support Steps: Drill a hole through the PVC support leg and install a rebar stake horizontally so that it will be set in the footing when the concrete is poured.
Step Installation items that are to be completed later in the install process:
- When adding Coping: Install coping so that it is flush with the step on both sides. Care in this step will prevent a lasting blemish that cannot be eliminated once the deck treatments are complete.
- When Backfilling: Backfill the step unit, same as the pool walls, taking extra care to eliminate voids under the steps by compacting the backfill.
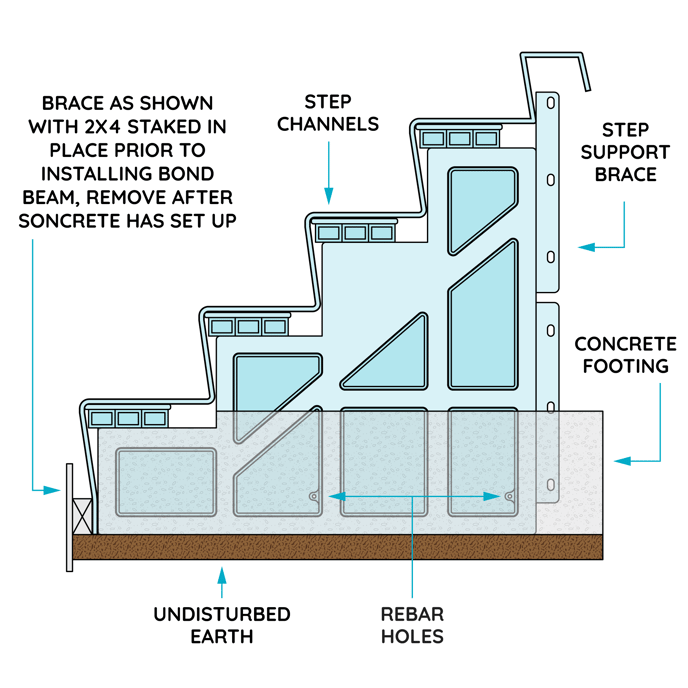
- When Pouring Concrete: Be sure to pour concrete behind the step as well. To keep the step straight when pouring the concrete footing, place a 2 X 4 or a 2 X 6 across the lower front length of the step section (inside the pool) securing it with stakes. If using cantilever foam forms, see page 30.
Steps and swim-outs are installed in the same manner.
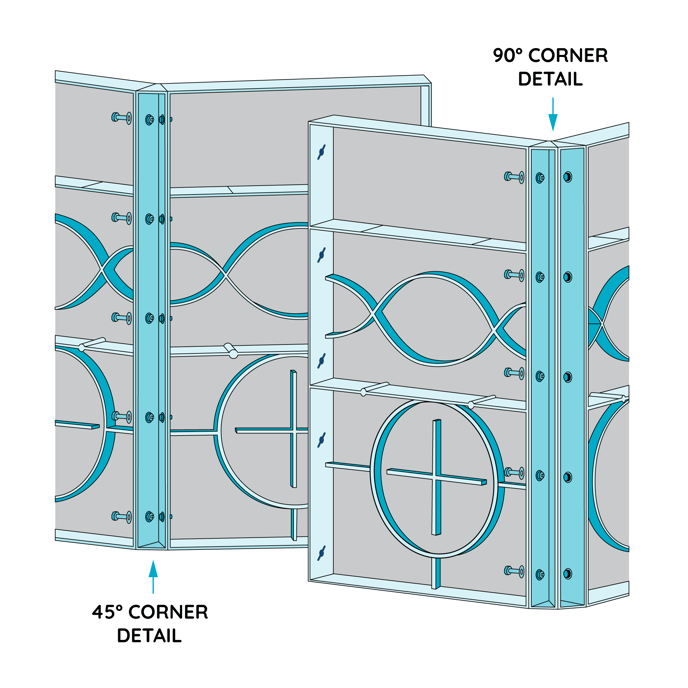
STEEL OR POLYMER WALL PANEL ASSEMBLY
Steel and polymer wall panels are assembled in virtually the same manner. The major difference is that polymer panels require every bolt hole filled whereas steel panels have additional bolt holes (located further away from the wall panel) for steps. These “step bolt holes” do not need to be filled if you’re not using that wall panel for a step connection.
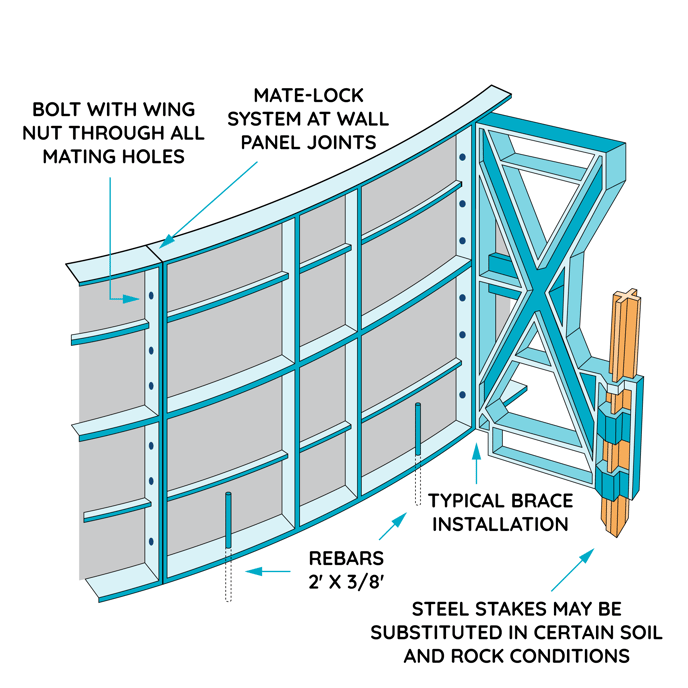
Begin at any corner, (or arc for radius pools). Begin connecting the panels and braces using the non-corrosive nuts and bolts provided; use only the inside bolt holes. Where two sections are joined, attach the adjustable A- brace "L Bracket" to the first or second hole of the panel flanges. Do not put the brace bracket/member between the wall panels.
IMPORTANT!
Do not put the brace bracket/member between the wall panels!
Do not over-tighten the screws!
Do not use wrenches; hand tighten in this step.
Next, attach the adjustable A-brace to one of the bottom holes of the panel flange. A nut and bolt must be used in every flange hole for polymer panels.
When tightening the panel's joints, make sure that the top and front-facing (inside of the pool) portions of these panels are flush/level with each other once joined. The backside of the panels does not need to touch and may not; this is common due to design.
Hand tighten the top and bottom bolts first while checking for proper alignment. When the panels are flush, hand tighten the remaining nuts and bolts.
Use the corner to help stabilize the entire wall assembly by alternating the panels assembled in each direction/side.
Use stakes and rope to hold the straight wall panels straight during construction if needed.
TIP
For Steel Wall Panels: The use of A-frame braces is optional where a rectangle corner panel connects with a straight wall panel.
The corner A-frames are not included unless they are ordered with the ****
Once the panels are all assembled, your steps are in place (if applicable), and there are no further adjustments needed, you can now go back and tighten all the bolts at the panel joints.
Be careful not to over tighten them as this can cause the panels to be pulled from their current placement and thereby change your measurements.
EXAMPLE OF A POLYMER WALL PANEL WITH BRACE
*If using radius polymer panels with flex design, see Appendix A: Polymer Panels.
EXAMPLE OF A STEEL WALL PANEL WITH BRACE
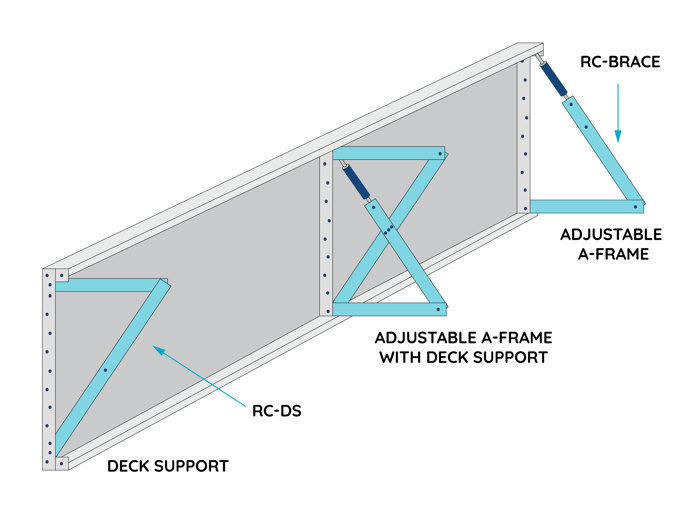
The below image shows how your Deck Support and A-frame brace connect to your wall panels individually. These two pieces do not connect to each other but can be used on the same panel for added support.
The below image showcases a completed pool. Notice that if using deck support, there is a bit of the undisturbed dirt cut away at the surface. This is to provide additional support to for your deck.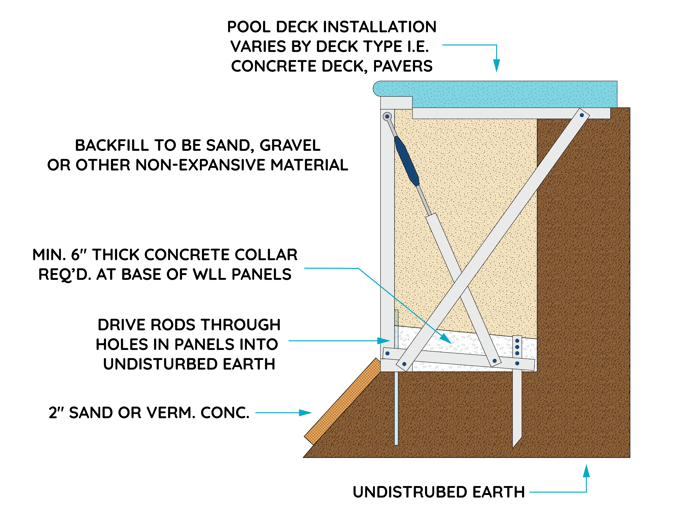
Continue to the next installation step: How to Square, Level, and Set Up The Main Drains for your Inground Pool
Didn't find the answer you were looking for? You can always contact us at support@royalswimmingpools.com or choose the category below to see our most frequently asked questions for that topic: