TOOLS
- Rebar stakes
- Hammer/Mallet
- Tie Wire
- Duct Tape
- Measurer
- Transit/Water Level
- String
- Screwdriver
- PVC glue
- Excavation Tools
SQUARING THE POOL WALLS
After all pool walls are assembled, for rectangle pools you’ll want to measure the completed pool wall assembly to ensure it is square and parallel. Do this by measuring the inside length and width of your pool. Also, measure both diagonals for straight wall pools and the steel check for radius pools.
An easy way to achieve squaring is by setting an alignment string along the bottom length of the pool wall and straightening a long wall first. Recheck the widths of the pool at the corners. Then measure the diagonals of the pool corner to corner.
When the dimensions are equal, the pool is squared. Straighten the remaining walls.
TIP
Some braces and/or soil conditions require the use of treated steel stakes. Low air temperature and/or firm soil may require the use of a wooden block or durable cap to be placed over the top of the stake while driving it home.
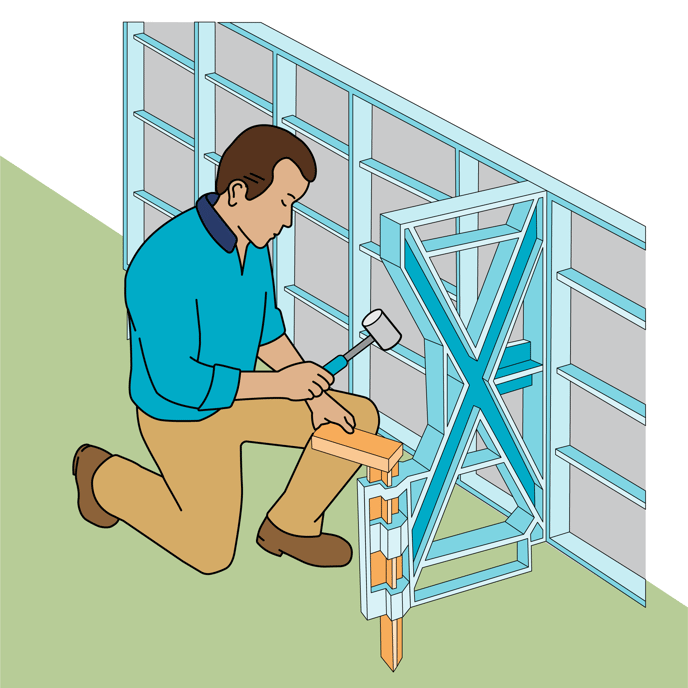
When the wall assembly is square, starting in the corners drive half of a rebar stake through the holes in each bottom flange and into the shelf. (Put rebar on the inside or outside of radius panels).
Depending on the rib configuration of the panel, the rod may need to be angled slightly to allow access for a hammer to strike it. The rod helps keep each panel properly positioned. While holding a level on its face, verify that the wall is plumb and drive the stake home. Fix its position by threading a 3/8"-16 x 1" bolt through existing or newly drilled holes in the socket and stake. Lock the bolt in place with a nut. Make sure the walls remain plumb.
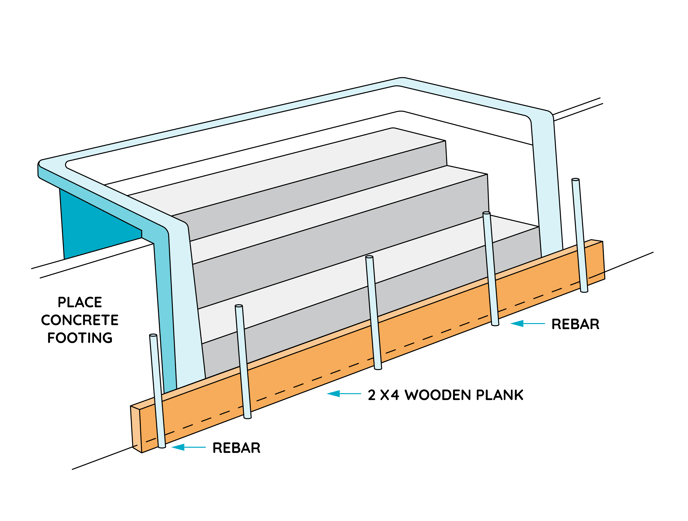
If you have not done so already, brace your step(s). Use a 2 x 4 wooden plank and rebar to hold the step into place. This will assist in keeping your step in place when it comes time to pour the concrete footer.
TIP
Remeasure diagonals, and/or steel check to ensure that your measurements have not changed prior to pouring the concrete footer. If measurements have changed something is amiss and will need to be adjusted.
LEVELING THE POOL TO THE PREDETERMINED ELEVATIONS
Check the level at each panel joint, steps, swim out, and at each of the corners. Level the pool walls with the transit or water level using shims under the pool wall as necessary. (¼'' amazonite, ½” 'to 1" treated woodcut in 4" X 6" squares, or 2" patio blocks or bricks will all work well for shims). This procedure is very important and plenty of time should be devoted to ensure a perfectly level pool. Following the leveling procedure, straighten the pool walls using the adjusting rods of the A-bracing system. For non-adjusting X-braces, plumb the panels while pouring the footing later. To achieve a straight sightline and plumb walls, stretch an alignment string along the top of the pool walls from corner to corner, on each straight section of wall.
MAIN DRAINS
Installation of the Main Drains is optional. If installed it must be done before pouring the concrete footings. Two main drains must be used as shown below for safety or no main drain can be installed. If not using main drains we suggest using two skimmers instead.
If using main drains, it is easiest to assemble the drains together prior to placing them in the floor of your pool.
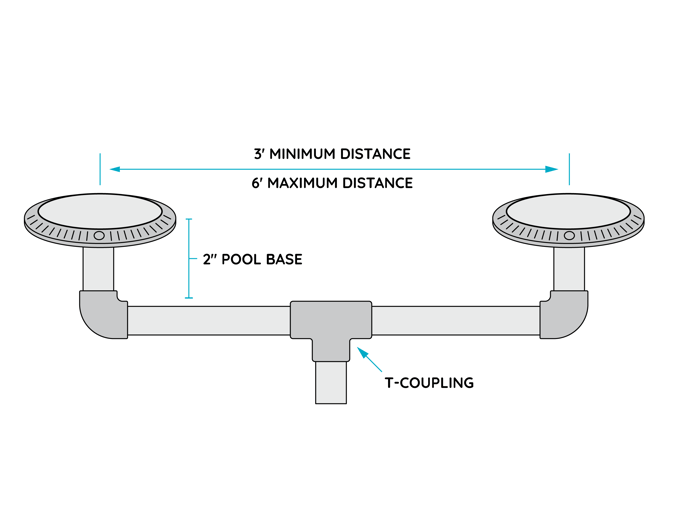
Using only the main drain bodies (leaving off the gaskets, trim rings and drain covers) connect the two main drains using 1½ “or 2" SCH 40 PVC with a T-coupling in the middle of two pieces of pipe 18"-36" long each. Use the side connection holes to connect the pieces.
Placing the drains upside down on a flat surface will help to make sure they are mounted and connected evenly and won't rotate when you install them in the pool floor.
Using the provided threaded plugs, glue them into the threaded holes located in the bottom of the drains with PVC glue.
IMPORTANT
The two main drains must be at least 3' apart, but no more than 6' apart.
Normally, your main drains should be centered in the hopper. You can position them differently if you wish, but maintain the required distance.
- Dig a hole 12" deep, and about a 6" wider than the drain assembly. Position the drain assembly and temporarily secure to the ground with rebar and tie wire at your desired position.
- Make sure to set the height of the drain assembly to your finished floor dimension (refer to the dig spec). This is done to the top of the drain body and not the trim rings/drain covers.
- Make sure to level both drains (front and back) to the finished floor dimension.
- In order to protect the drains and screw holes from debris and concrete, you’ll want to duct tape over the top of the drain bodies.
- Dig a trench (wide/deep enough to fit the entire pipe) from the center of the assembly at the connecting T, across the hopper, up the hopper wall, and under the pool wall that is closest to the filter system. Run the pipe through the trench, under the pool wall, and stub up above the expected level of the concrete footer for the wall.
- Cover the end of the pipe with tape or a pipe cap to prevent concrete from entering the pipe when pouring concrete later.
- Fill in the remainder of the hole around the drains with sack crete up to about 2" below the top of the drains. Typically, this is about even with the excavated pool floor around it. This will lock the drains in place, and prevent movement in the event of some minor settling or muddy ground conditions as well as many other problems associated with drain movement.
- You can wait to do this in order to use the same concrete that you are using for your footer if you wish, but be careful that the drains do not get moved in the process.
Continue to the next installation step: How to Install Coping on your Inground Pool
Didn't find the answer you were looking for? You can always contact us at support@royalswimmingpools.com or choose the category below to see our most frequently asked questions for that topic: