TIP: Have the following on hand before you begin:
- Level and/or shot stick
- Mason’s string
- Spray paint
- Tape measurer
- (8-10) 3/8" x 24" rebar stakes
- Hammer
- Dig specification drawing
We will cover a guideline for laying out both Rectilinear, Oval, and Freeform pools. Rectilinear pools are those defined by straight sides such as Rectangles, Grecians, L Shapes, Romans, etc.
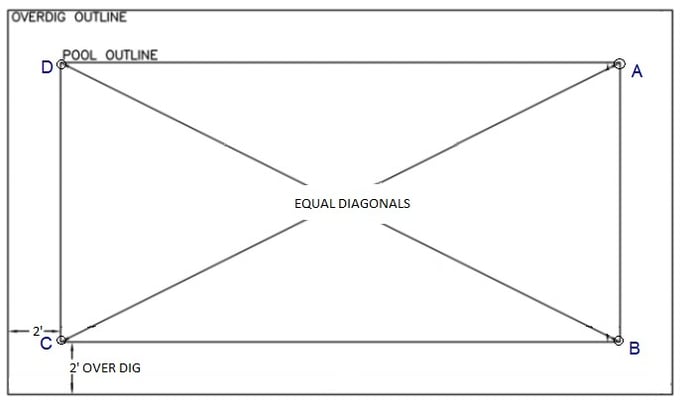
Once the pool’s location has been chosen, its perimeter must be marked on the ground. The area beyond the perimeter is known as the ‘over dig’ (see Figure A on the next page) and is used for wall and brace placement. The over dig area should be approximately 2 feet around the entire perimeter of your pool.
RECTILINEAR POOLS
Rectilinear plan drawings (See Figure A) should show the over dig perimeter, the pool perimeter, and the diagonal measurements between corner stakes. The plan view for a freeform pool must show the center line(s) and all point distances from it, including fixed reference points (also known as box dimensions) which will be the corners out your box layout.
TIP: For nearly all pool forms (aside from round pools), establishing a box layout is the easiest way to set up your pool. The box layout for a Rectilinear pool is the pool perimeter or outline using the actual pool corners. The box layout for freeform pools will use the “Box Dimension” corners as outlined on your dig spec
FIGURE A:
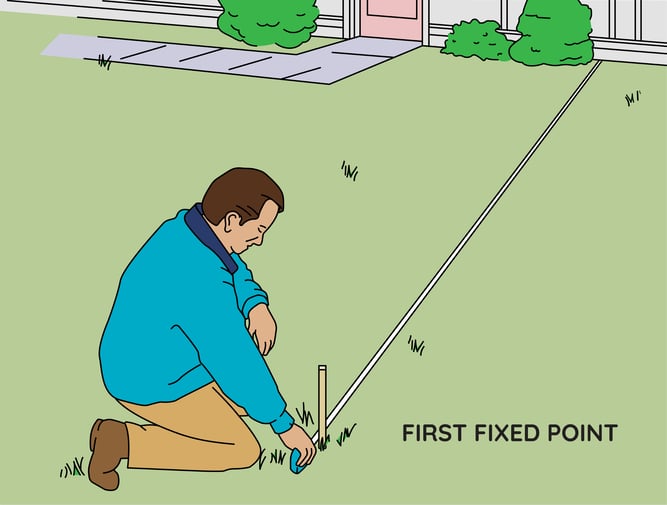
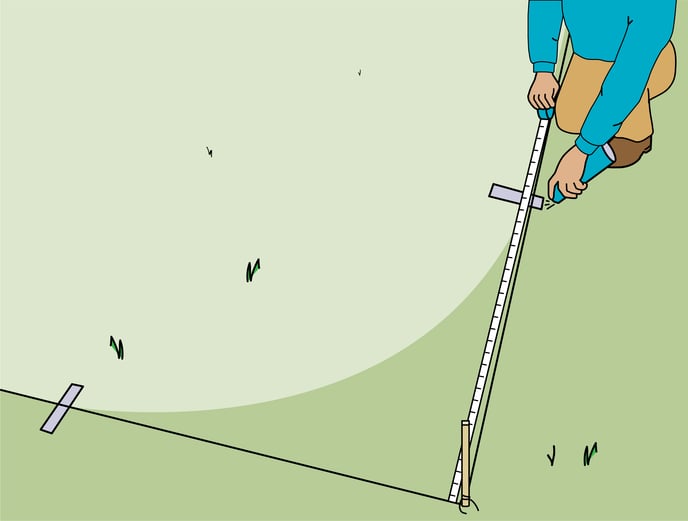
STEP 1
Choose a fixed point away from the over dig, typically measured from a house or other dominant structure. Measure and mark the distance of the fixed point as it will be referenced when setting and resetting the first corner stake.
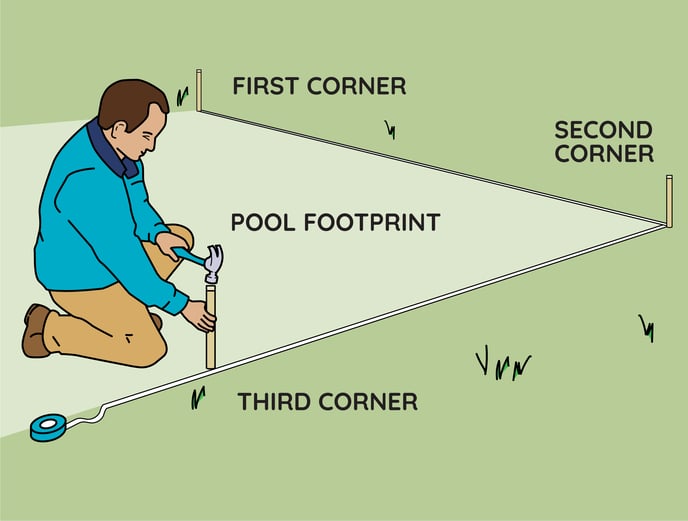
STEP 2
Measure the distance from the fixed point to the location of the first corner stake. Measure the distance from the first corner stake to another fixed point, preferably one that is perpendicular to the first fixed point. Record the second point location, along with its measurements form the first fixed point and the corner stake. These notes are important and become more so if stakes are moved or if the excavation must be modified.
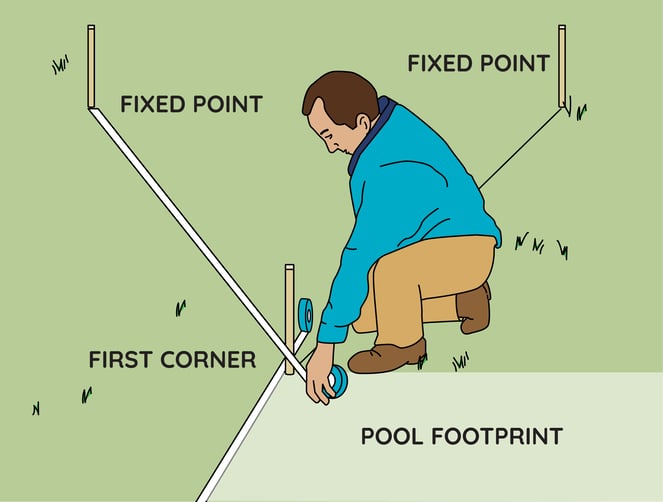
TIP: If you are laying out a Rectilinear pool, the first corner stake represents the first corner in your pool’s perimeter. If you are setting up a Freeform pool, this corner stake will be the first corner of your “Box Dimensions” on your dig spec.
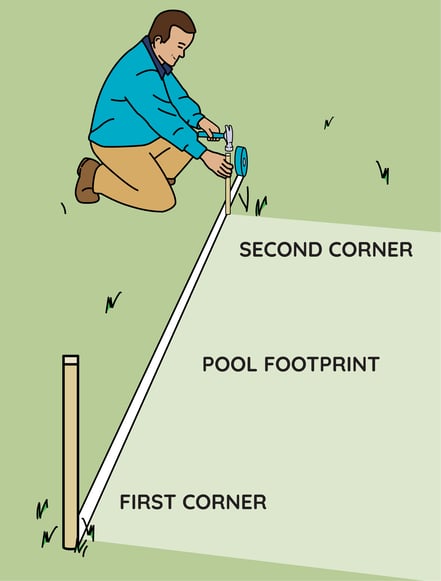
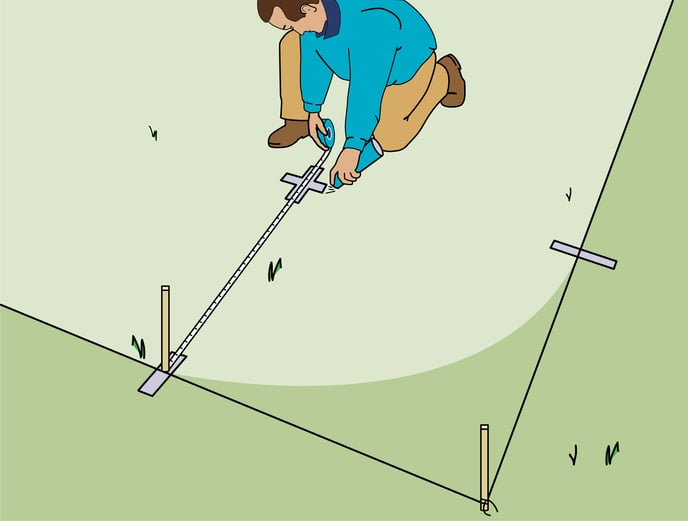
STEP 3
The remaining corner stakes can be set by measuring their locations from the first stake and squaring the corners to each other. From the first corner, layout the distance of one side of the pool to the second corner and mark with a rebar stake. Use the measurements provided on your dig spec to determine the distance between the two stakes.
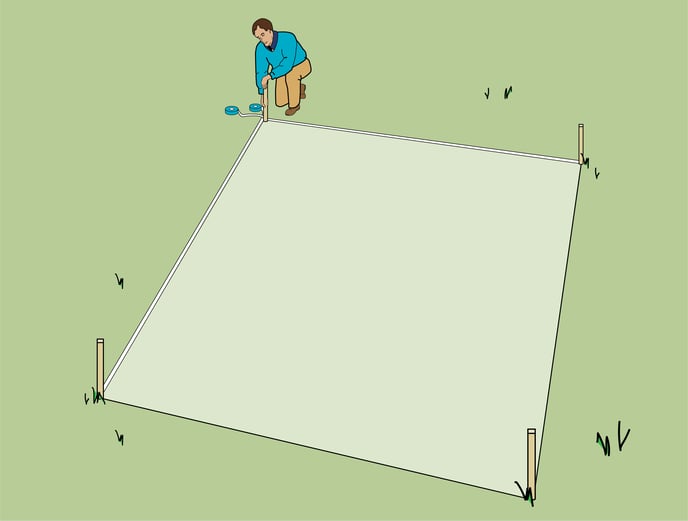
STEP 4
Starting at the second corner, measure out the appropriate length to the third corner of your pool/box. Mark the third corner with a rebar stake and square to the previous corners.
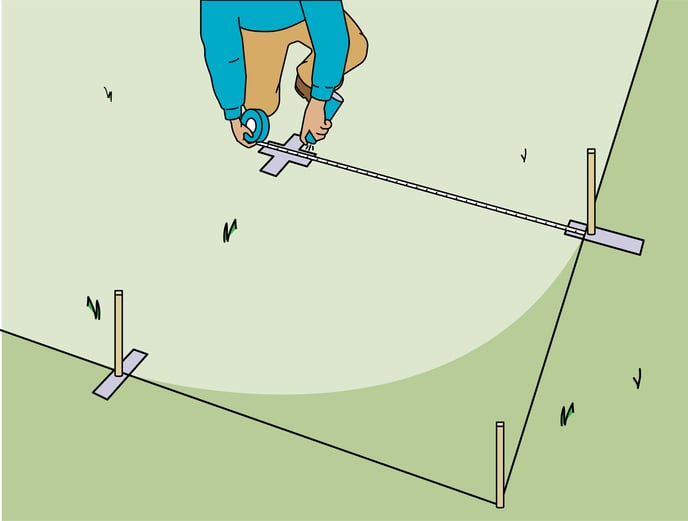
STEP 5
Continuing to use the measurements on your dig spec to measure and you’re your fourth corner.

STEP 6
Measure from the fourth corner back to the first corner and confirm that the distance matches the appropriate length on your dig spec. If the measurement if different from your dig spec, something is not set properly. Remeasure your distances and adjust accordingly.
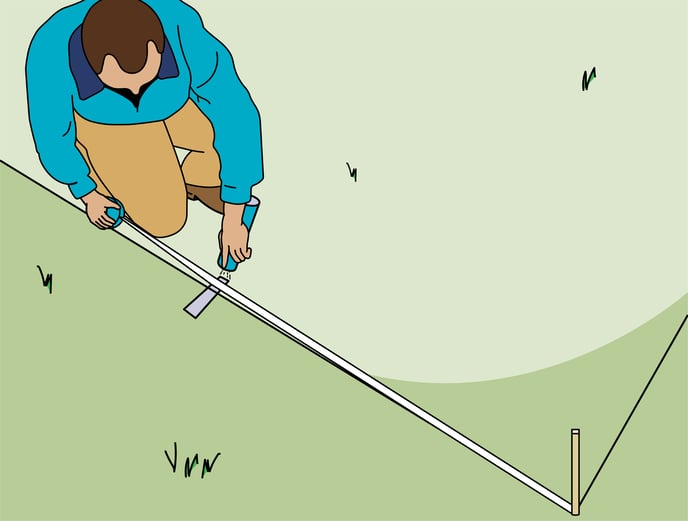
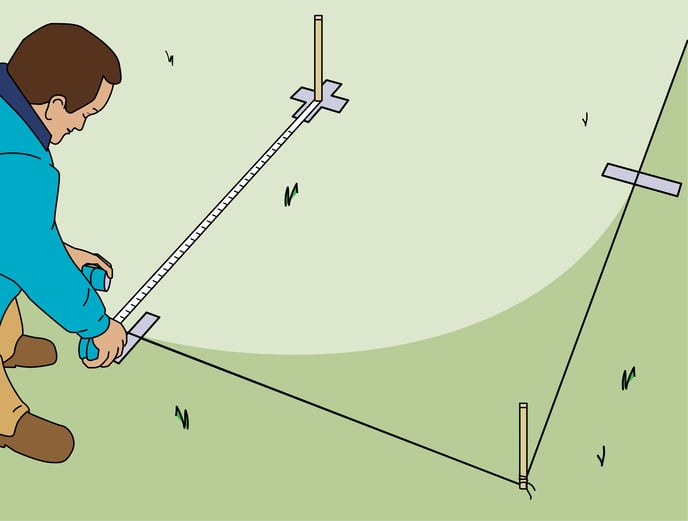
STEP 7
After completing the layout, measure the length between opposite corners (the first and third corner AND the second and fourth corner). The length of each diagonal should be equal to each other. Square the layout by finding equal diagonals.
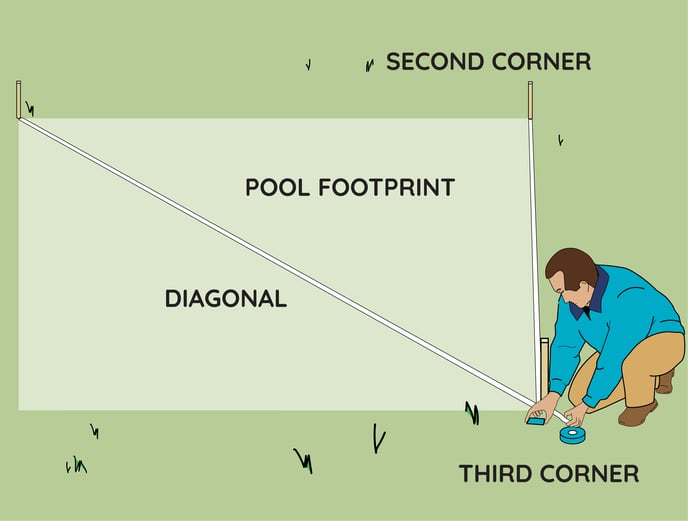
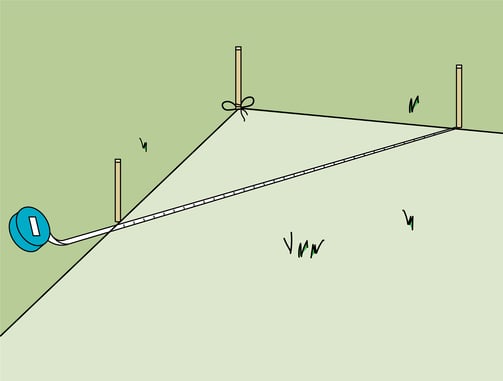
HOW TO KEEP THE LAYOUT SQUARE
Care must be taken to keep the layout square. Measure the distance between opposing corners and move the stakes until they are at an equal distant. At the same time, the length and width dimensions of your pool lines/sides must remain equal to their intended measurements.
TIP: Equal diagonals do not guarantee that a pool is square unless the width, length, and diagonal dimensions are equal to their opposing line measurement.
Step 1
Starting at a corner, mark one side at 3 feet.
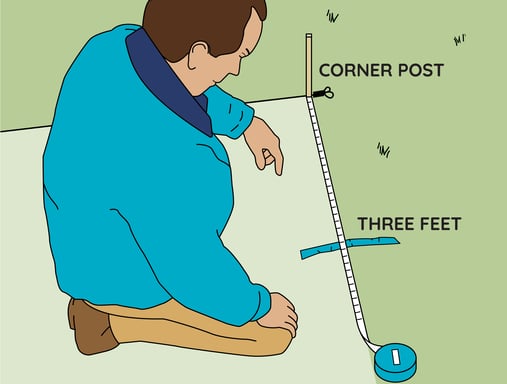
Step 2
Mark the perpendicular side at 4 feet.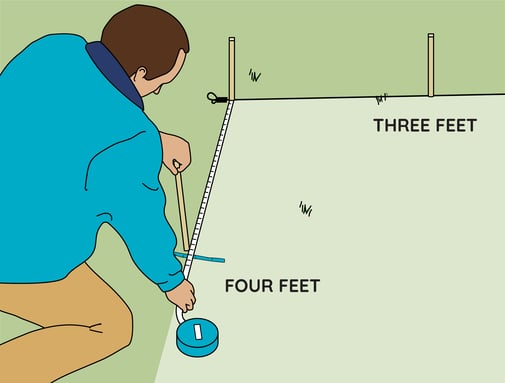
Step 3
The corner is square if diagonal distance between the two points measures five feet. 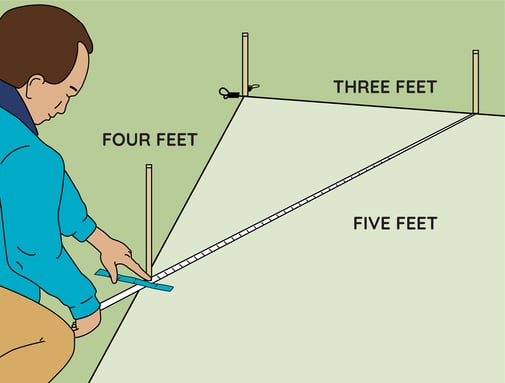
Step 4
Adjust the sides as required to make square. Doubling or tripling the leg. Measurements will result in increased accuracy.
RECTANGLE POOLS WITH RADIUS CORNERS/ROUND POOLS
Rectangle pools with radius corners (or Round Pools) can be laid out by finding a point at the center of the arc and placing a stake there. Using a measuring tape attached to the stake, hold a can of spray paint at a point equal to the length of the radius on the tape. Paint the complete circle as allowed by the measured length.
To find the corner radius axis of a rectilinear pool, use string lines or straight edges projecting from perpendicular sides of the pool to a stake placed at their intersection.
Step 1
Measure back from the corner and stake the same dimension as the radius of the corner.
Step 2
Repeat measurement and mark on the second side.
Step 3
Place a stake at the mark on each side. Measure the same distance and spray a small arc.
Step 4
Measure the same distance and spray a small arc from the second leg.
Step 5
Place a stake where arcs intersect. This will be the corner.
Step 6
Tie a wire to the axis stake(or use a tape) and mark the corner with spray paint.

Step 7
Finished round corner layout. 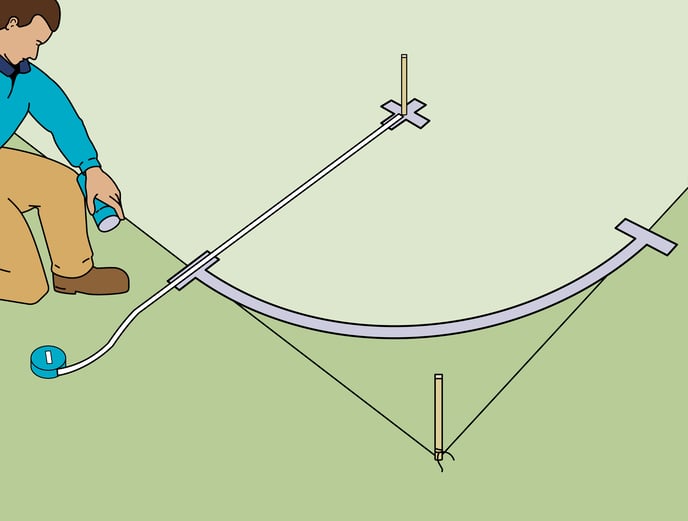
TIP: Skip ahead to EXCAVATION if you are installing a rectangle pool with radius corners or a round pool.
OVAL POOLS
As any oval or freeform shape fits within a rectangle, it is typically easier to set the location of the pool if the rectangular box is laid out first (as described at the top of this page)
To get your box dimension for an oval pool, find the widest and the longest measurements on your dig spec for each side of your pool. Add the desired over dig distance to each measurement.
A traditional over dig is 2’ however, the purpose of your over dig is to accommodate your braces. Size accordingly. Box dimension example: if one side of your pool measures at 18’ wide (including any step lengths), and your desired over dig is 2’, you would measure that side of your box out 22’ (18’ width, plus the 2’ over dig on each side).
Repeat with the remaining 3 sides to complete your box and square to your fixed points.
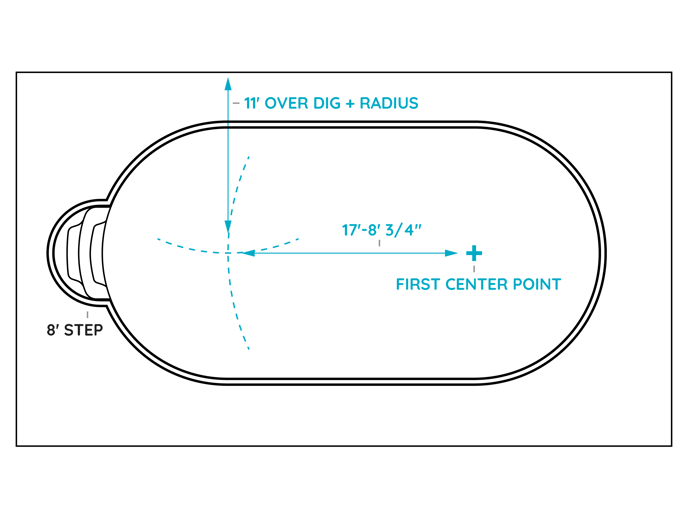
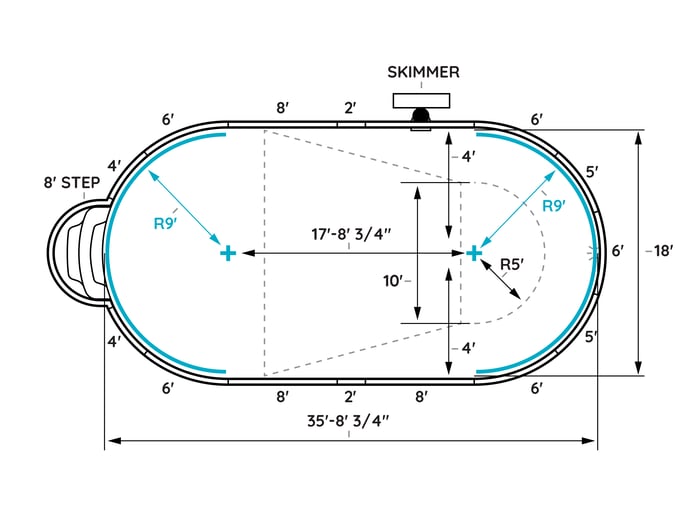
Once you have your rectangle, start by finding your center line stake points. Start at either short-side on your box. From the center of that line, measure inside your box the distance of your over dig plus the distance of your radius (the over dig is traditionally 2’, however depending on your brace type this could be more of less- check your dig spec for the radius). For this example, our radius is 9’. So, measuring inward the traditional 2’ over dig plus the 9’ radius will result in marking the ground at 11’ in from your rectangle.
From that mark, go over perpendicularly to the side of your rectangle and measure inward another 11’. Drive a rebar stake in the ground where these two points intersect to indicate your first center point as shown.
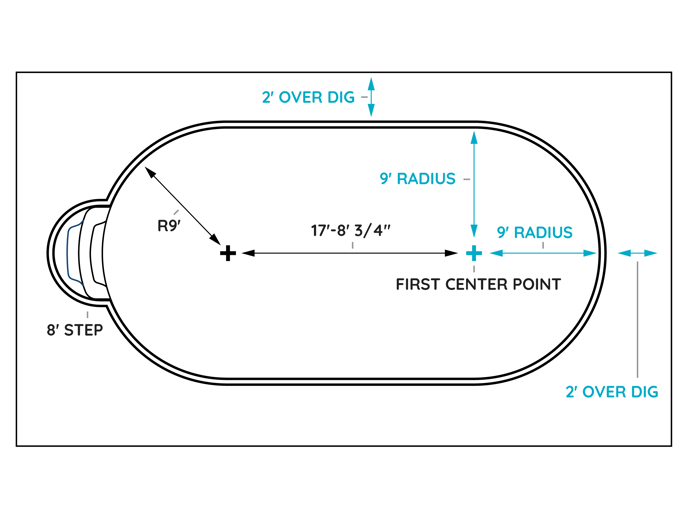
You can repeat this process on the opposite side of your pool. Once you have your two center points staked, the distance between them should equal the center line distance shown on your dig spec. In this example, that would be 17’ 8 ¾”.
Another way to find your second center point is the swing method. Tie string or attach your tape measurer to your first center point and measure out the center line distance found on your dig spec. In this example, that would be 17’ 8 ¾”. Keeping the string or measurer tight, use spray paint while you swing your 17’ 8 ¾” radius arc. Do the same for your over dig plus radius (here 11’). Where these two points intersect should mark your second center point. Square both center points to your fixed point before moving forward.
Tie string or attach your tape measurer to one of the center points. Measure out the radius (from your dig spec) for the rounded portion of your pool. In this example, the radius is 9’.
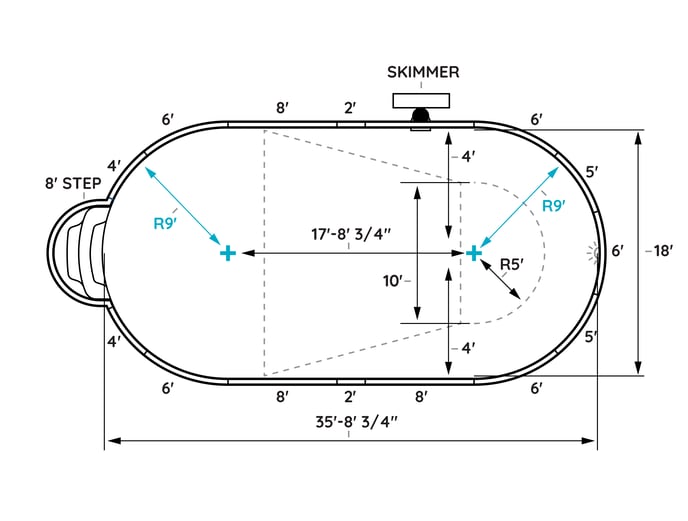
Keeping the string or measurer tight, use spray paint while you swing your 9’ radius arc from one straight wall edge to the other. You can double check these marks by measuring from the center point stake to any spray paint mark. The measurement should be 9’ every time if accurate.
Once you have both radius marks laid out you can measure the straight edge walls, making sure that the numbers match your dig spec, and mark/string them according.
You can also use string to showcase your future slope line locations.
FREEFORM POOLS
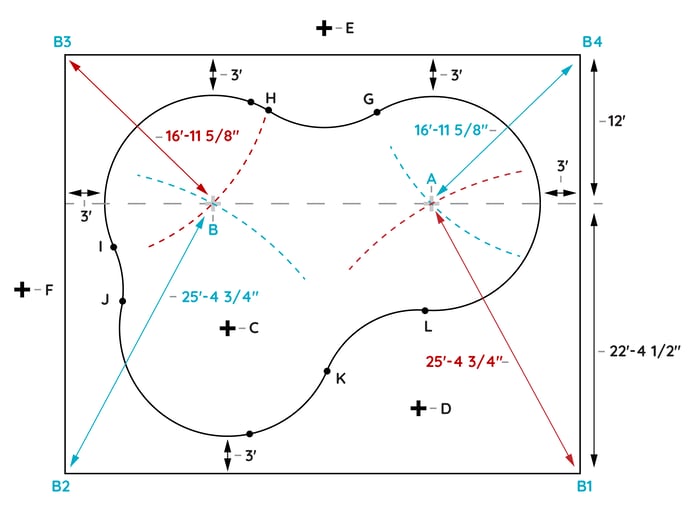
For freeform pools, the rectangular box (from the first section of this article) which will enclose the pool is laid out and measurements are taken from the corners of the box to locations within the pool area. Your box corners will act as your fixed points once the box is complete and squared.
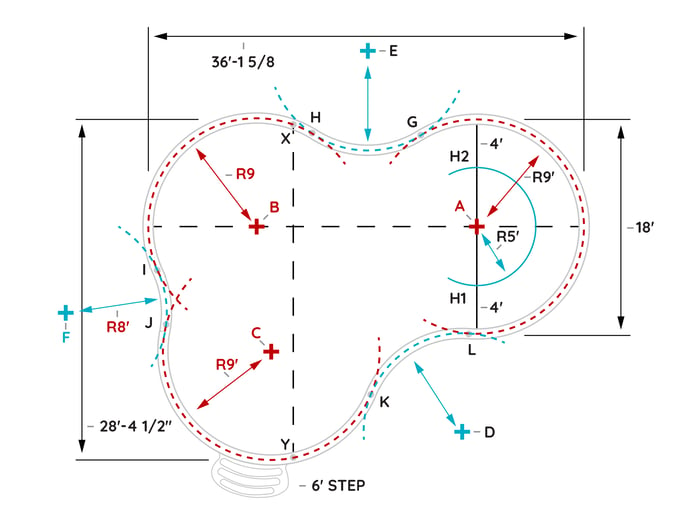
Using your dig specs you’ll want to first identify the center point(s) and center line(s). Use the swing method outlined on pages 14 and 15 to measure the shown distance from your box corners to your center pin locations; as shown in the below diagrams.
For this example, we will be using the dig spec below however always refer to your own dig spec for specific measurements.
|
STAKE OUT |
|
|
A – B |
18’ – 1 5/8” |
|
A – C |
19’ – 10 ¼” |
|
A – D |
17’ – 0” |
|
A – E |
17’ – 0” |
|
B – C |
10’ – 5 3/8” |
|
B – E |
17’ – 0” |
|
B – F |
17’ – 0” |
|
C – D |
17’- 0” |
|
C – F |
16’ – 11 ½” |
|
BREAK-OFF |
|
|
A – Y |
17’ – 2 ½” |
|
A – X |
24’ – 4” |
|
A – H1 |
5’ – 5/8” |
|
A – H2 |
5’ – 0” |
|
BOX DIMENSIONS |
|
|
B1-B2 |
42’- 15/8” |
|
B2-B3 |
34’- 4 ½” |
|
B1-B3 |
54’- 4 5/8” |
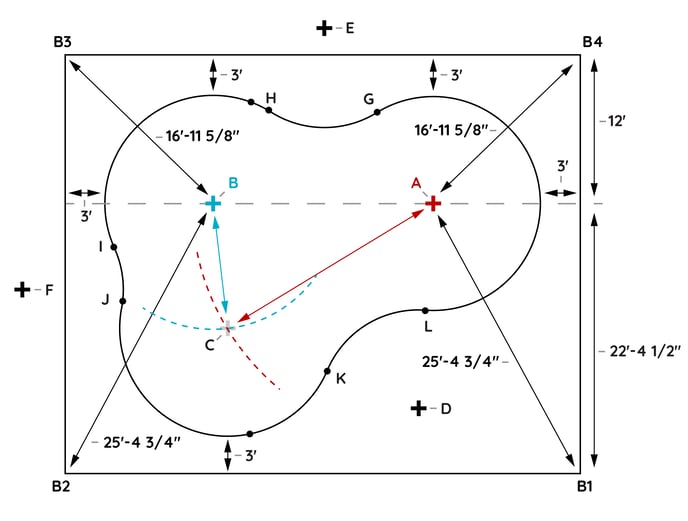
If you have additional center pins, like center pin C in this example, you can use the swing method to find that as well. Start by finding the appropriate measurement from your dig spec. Here, the “Stake Out” table a measurement from stake A to stake C as well as a measurement from stake B to stake C. Use these distances with the swing method to locate your additional center pins.
Make sure that your marks are accurate by measuring the distance between the stakes and making sure that they match what is on your dig spec. For example, from A to B should measure 18’-1 5/8”. This measurement is also known as your centerline.
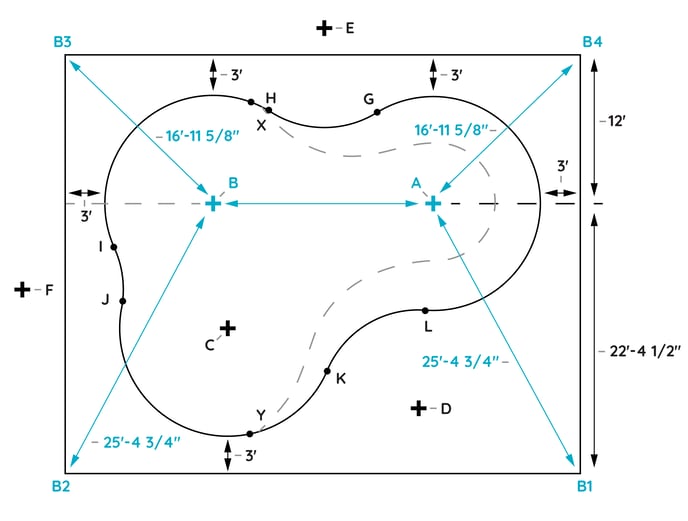
You can tie a string from one end of the centerline to the other. Refer to the dig spec and mark all other points including straight lines and arcs as indicated. Once that is complete the perimeter can be marked with paint.
TIP: There can be radius and reverse radius portions of your pool. A radius would form a circle on the inside of your pool, whereas a reverse radius would form a circle on the outside of your pool.
Both Radius and Reverse Radius arcs can be found using the swing method. Attach your tape measurer or string to your first swing pin (center pin) and measure out the appropriate distance shown on your dig spec. While keeping your measurer or tape pulled tight, use paint to swing your radius. Repeat this for your other swing pins/center pins. à
Find your reverse radius swing pins by using the measurements provided and locate the same way as you found your center pins. Make sure to use the appropriate measurements by referring to your “stake out” table as it is typically easier to measure from existing pins than from the corners of your box. For example, you would use the stake-out distance between A and E as well as B and E to find Stake E. Once E is found, swing and mark the reverse radius.
Continue to the next installation step: How to Excavate for your Inground Pool
Didn't find the answer you were looking for? You can always contact us at support@royalswimmingpools.com or choose the category below to see our most frequently asked questions for that topic: