
WARNING: Your pool must be on level undisturbed soil. An unlevel area may cause excessive stress on the pool’s wall and framework and may result in pool failure. See INSTALLATION CAUTIONS here.
Refer to “POOL AREA DIMENSIONS” for your pool diameter & radius in the Round Pool Installation section.
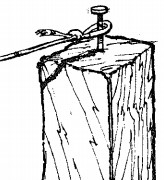 At the center of where you want your pool to be, put a stake in the ground. Drive a long nail in the top of the stake as shown. Tie a loop on one end of string or twine and slip the look over the exposed nail head as shown. Cut the twine so it is at least 12” longer thank your CLEARANCE RADIUS. (the clearance radius is one foot (1’) longer than the true pool radius. For example, if your pool has a 12’ diameter, the true radius is 6’ as the radius is half the diameter, making the clearance radius 7’.)
- Using three center stake twine and a tape measurer, measure the out to your pool clearance radius. (See POOL AREA DIMENSIONS) At the point of your clearance radius, tie a sharpened stick or screwdriver to the twine. Work in a circle around the pool area and mark your pool clearance radius. Common ways to mark this area: with a sharp object, lawn edger, white powder, or spray paint. Remove all the sod within the clearance radius. This sod can be saved for future landscaping needs.
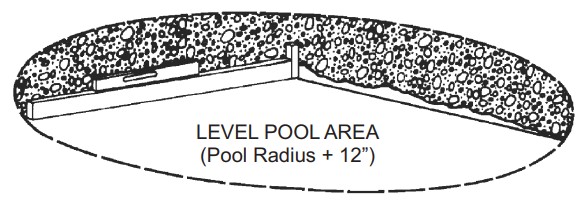
- After all of the sod has been removed, you must make the pool area absolutely level as measured by a level or transit, not simply by the naked eye. Find the lowest spot within the pool area and level the ground to that lowest spot. Do not add dirt to the low areas as that will cause settling after the pool is filled with water. The high areas must be dug away. The footing (perimeter) of the pool must be a solid foundation to prevent the pool from settling into dirt that is loosened by rain and water splashing over the side. Clean the area of all sharp objects, including roots. For leveling, we recommend that you use a long straight edge board and a carpenter’s level or transit. See appendix for making your own leveling device here.
- Once level, rake the entire clearance area smooth. Clear any rocks, pebbles, sticks, twigs, roots, or sharp objects which may puncture your pool liner.

PRO TIP: Begin clearing the center and work your way out. Do not remove the center stake yet.
SEE APPENDIX B FOR OPTIONAL DEEP SWIMMING AREA HERE. Only variable depth/expandable liners can be used if you wish to create a deeper area in your swimming pool. You must have pre-planned your liner purchase for this to be an option.
Continue to the next step: How to Assemble your Above Ground Pool's Bottom Wall and Rim
Or view our guide on the 17 steps to installing your Round Above Ground Pool here.
Didn't find the answer you were looking for? You can always contact us at support@royalswimmingpools.com or choose the category below to see our most frequently asked questions for that topic: